- Help Center > Company Setting・Organization Management > SSO・Provisioning > Microsoft Entra ID( AzureAD ) > [Entra ID] Provisioning Settings
[Entra ID] Provisioning Settings
Answer
Contents
If you wish to use the provisioning function, please follow the steps on this page.
This process is to complete Provisioning; below is the overview of the workflow.
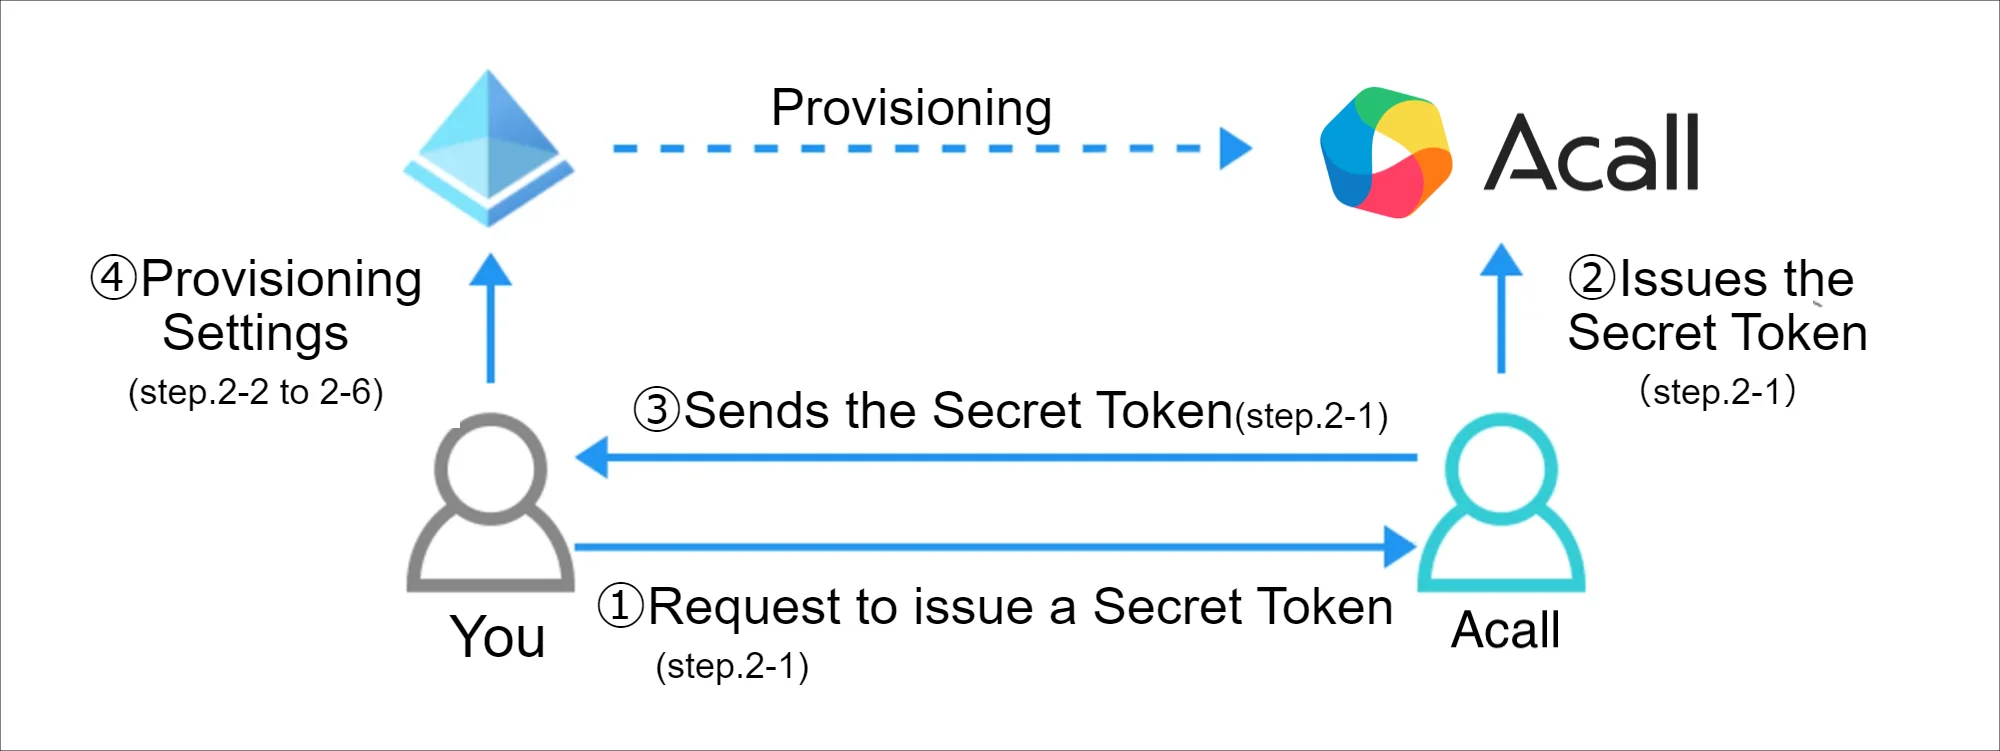
Contact Acall to Issue A Secret Token
Contact Acall via contact form to issue a secret token. Acall will come back to you within 5 working days.
Set Up Admin Credentials
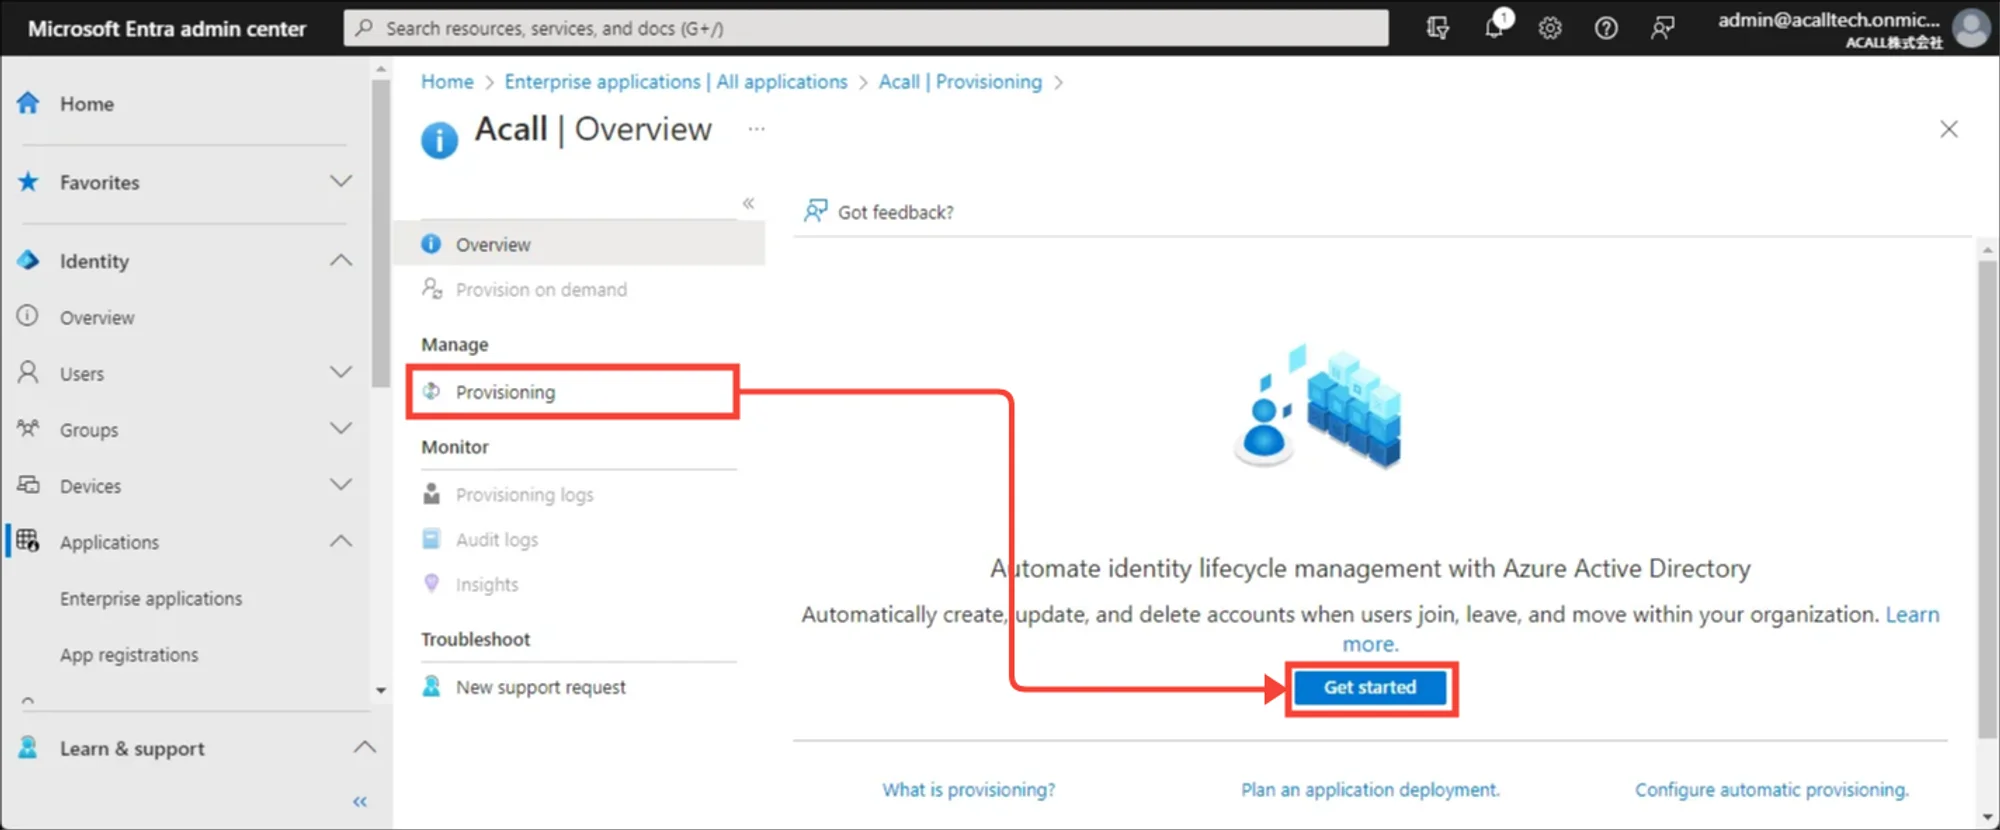
Open [Provisioning] in Acall application and click [Get started].
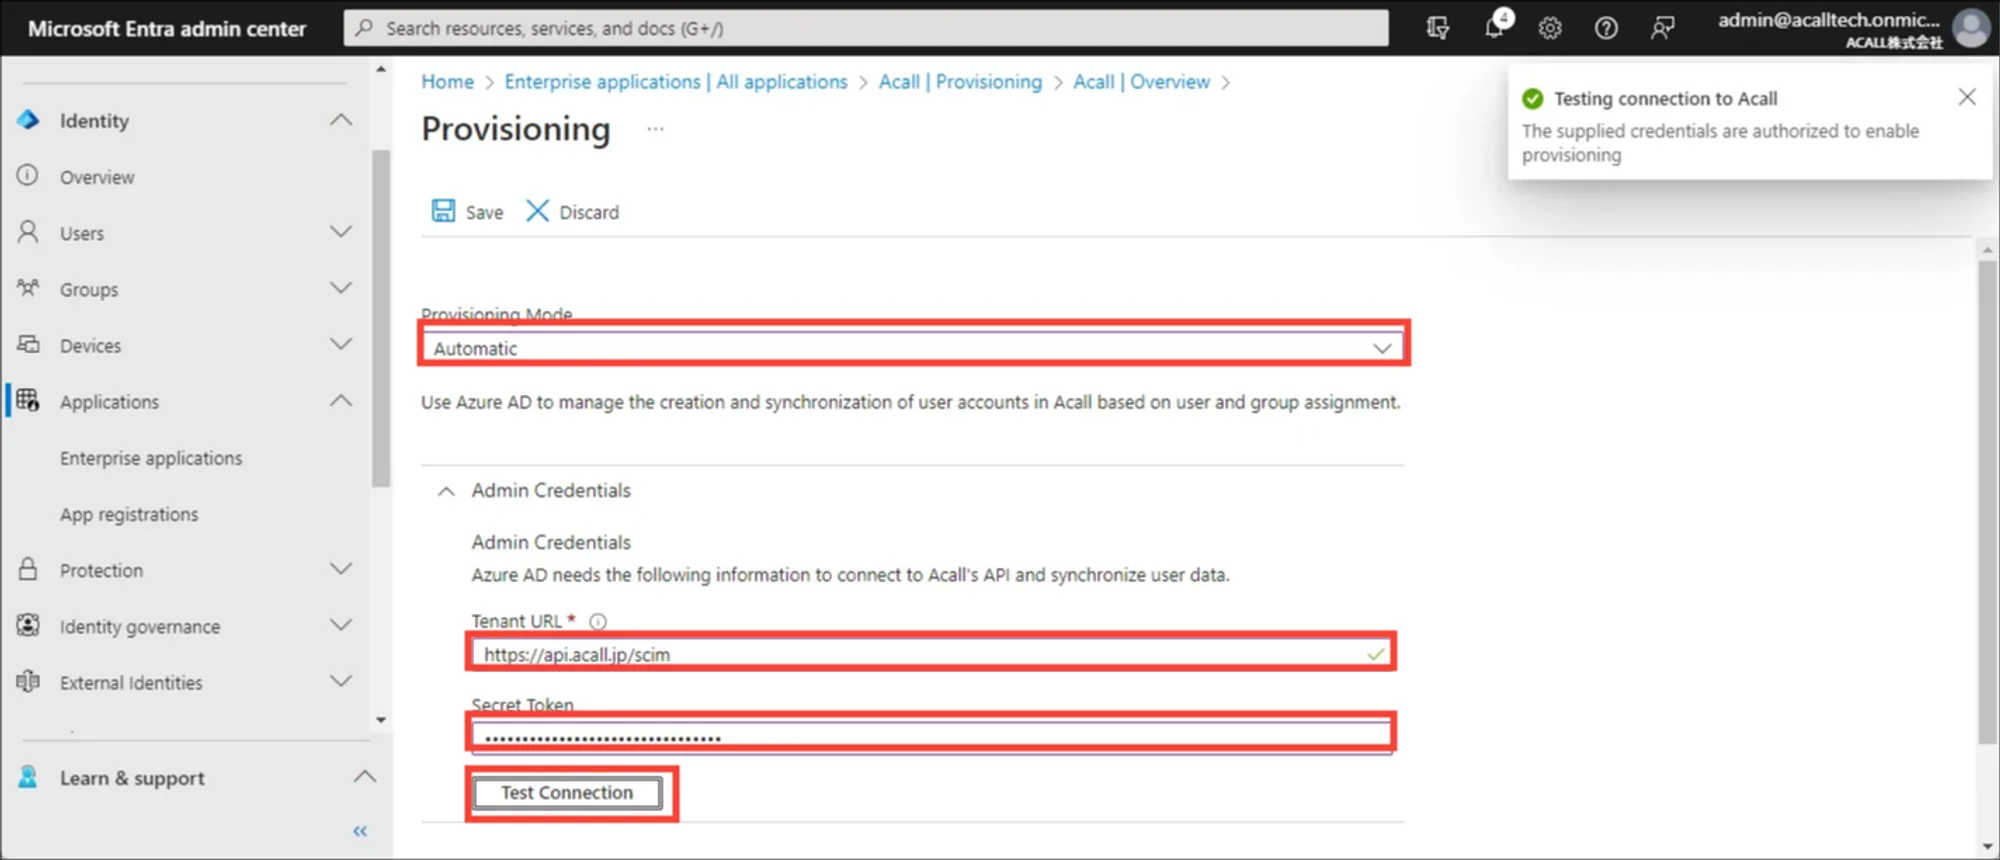
Set [Provisioning Mode] and [Admin Credential] as follows.
| Items | Values |
|---|---|
| Provisioning Mode | Automatic |
| Admin Credential (Tenant URL) |
*Do do not enter “/” at the end of the URL. |
| Admin Credential (Secret Token) | (Published by Acall) |
Click [Test Connection] to check connection. Once [The supplied credentials are authorized to enable provisioning] is shown at the upper right, click [save].
Disable Provisioning For Groups
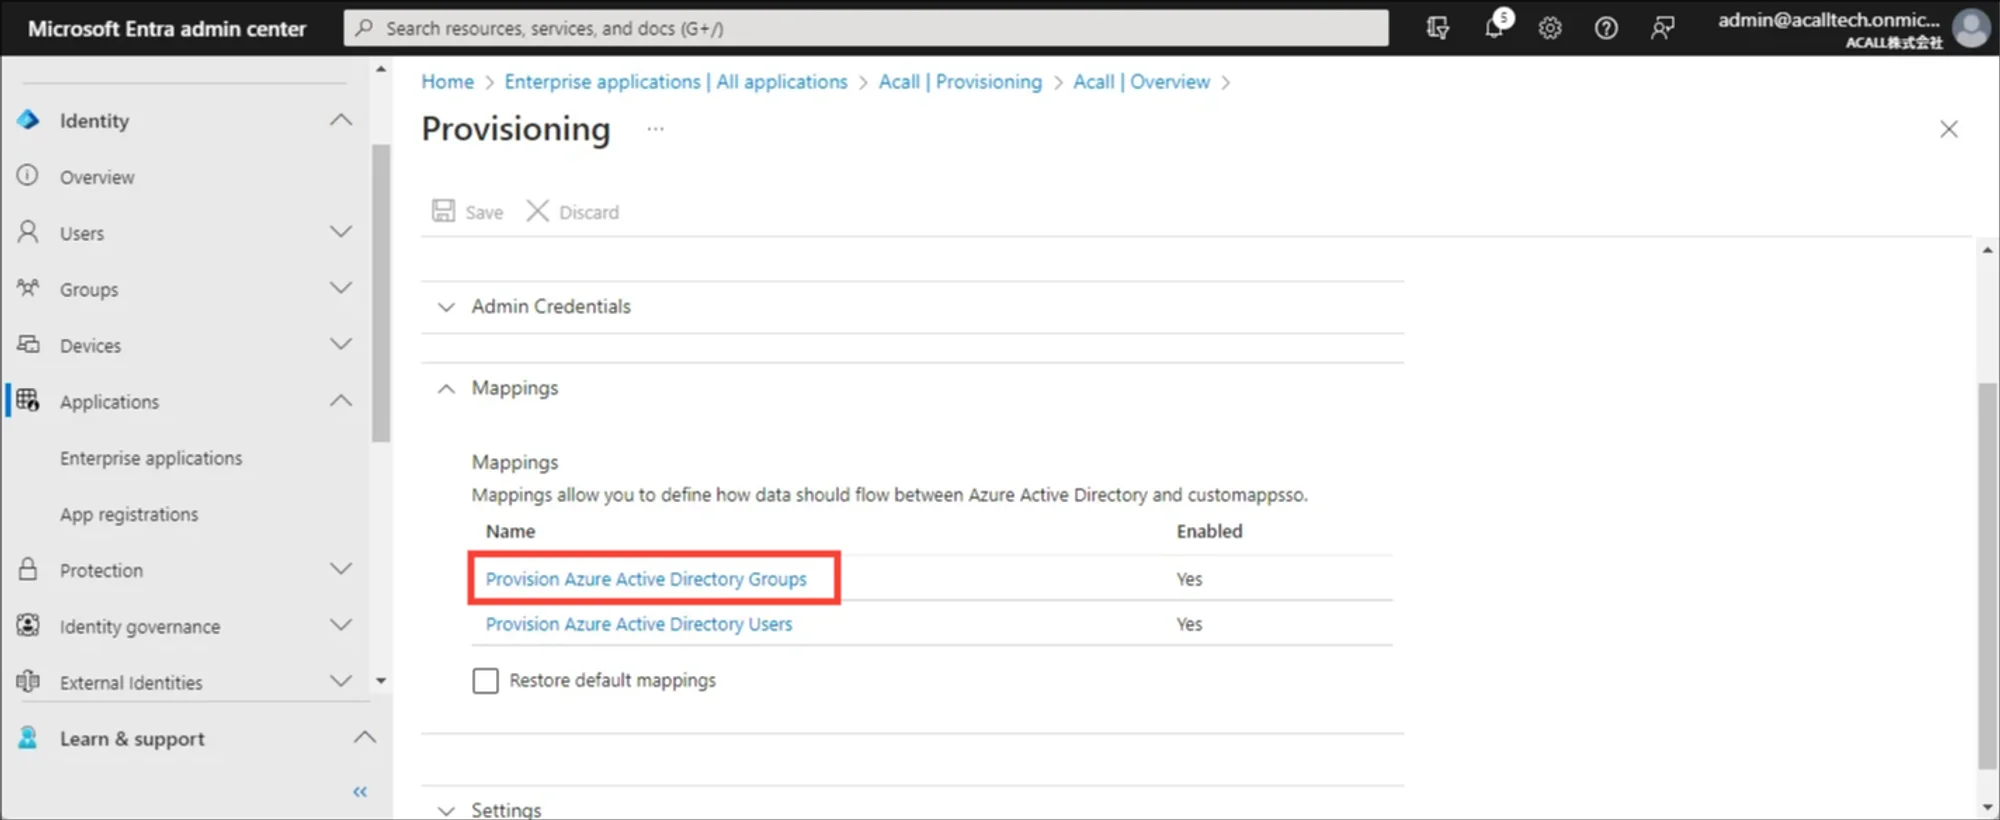
Expand [Mappings] and click [Provision Microsoft Entra ID Groups].
*In case you closed the window, open [Provisioning] menu in Acall application and click [Edit Provisioning].

Customers who use group provisioning should also set it to disabled here to prevent unintended synchronization.

Please activate and set up later according to "[Entra ID] Group Provisioning Settings".
Expand [Mappings] and click [Provision Microsoft Entra ID Groups].
Note

In case you closed the window, open [Provisioning] menu in Acall application and click [Edit Provisioning].
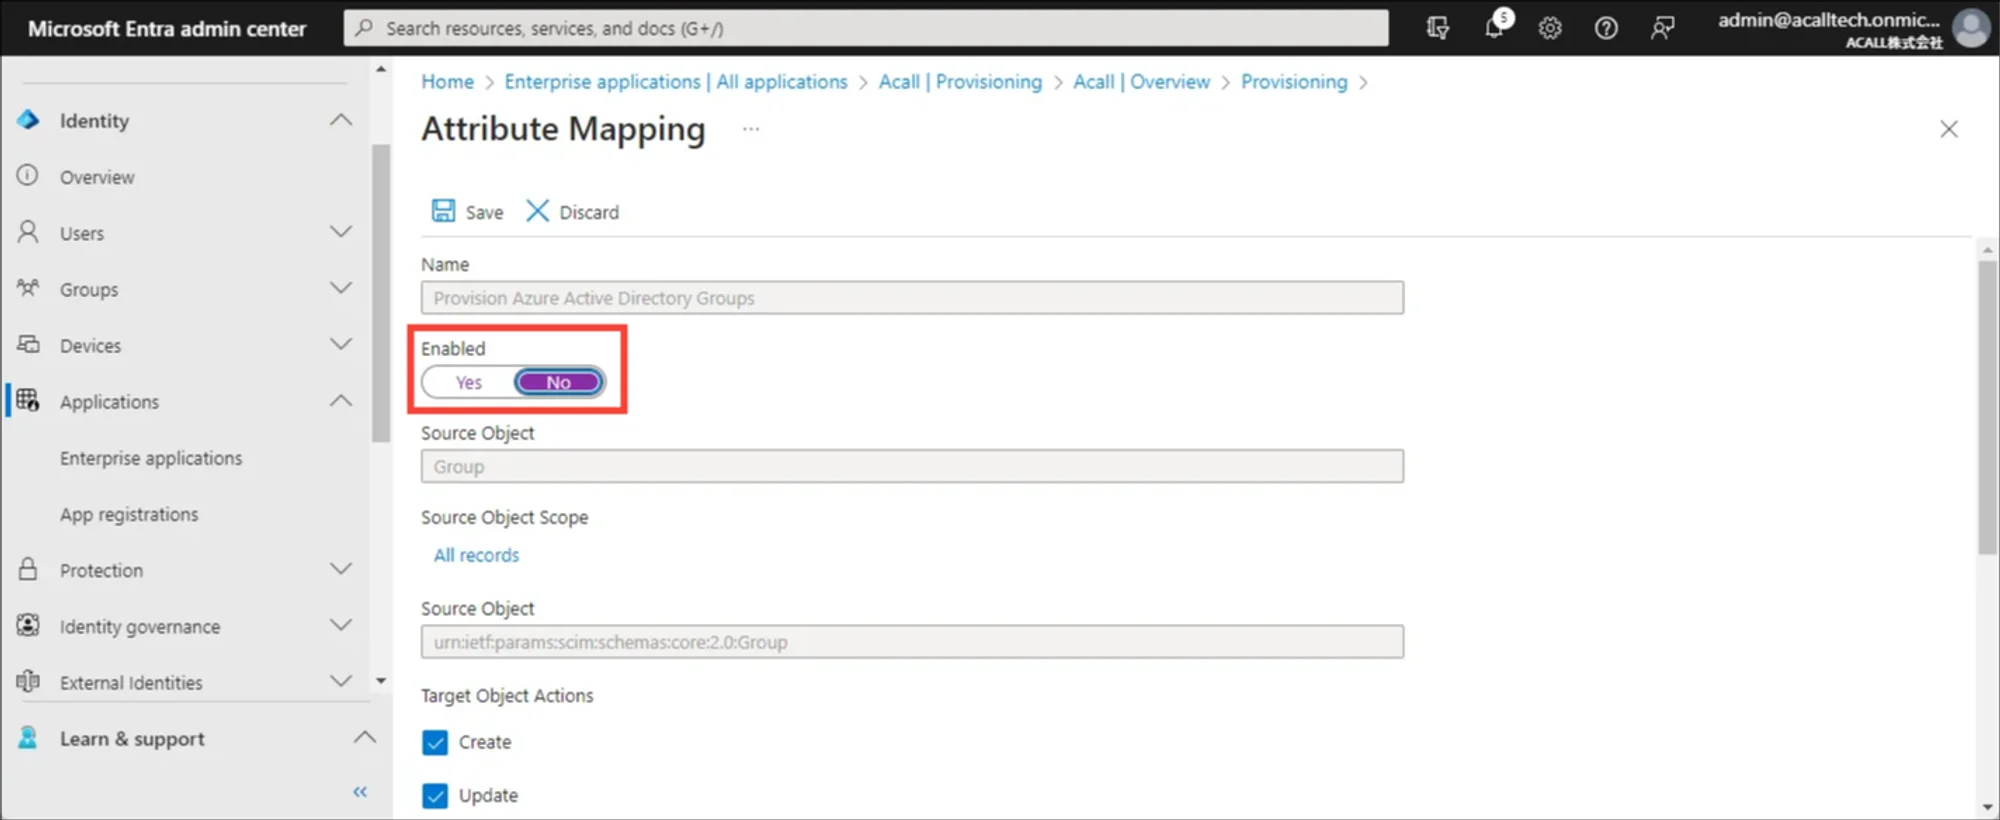
Turn the [Enabled] toggle to ‘No’ and save.
Attribution Mapping
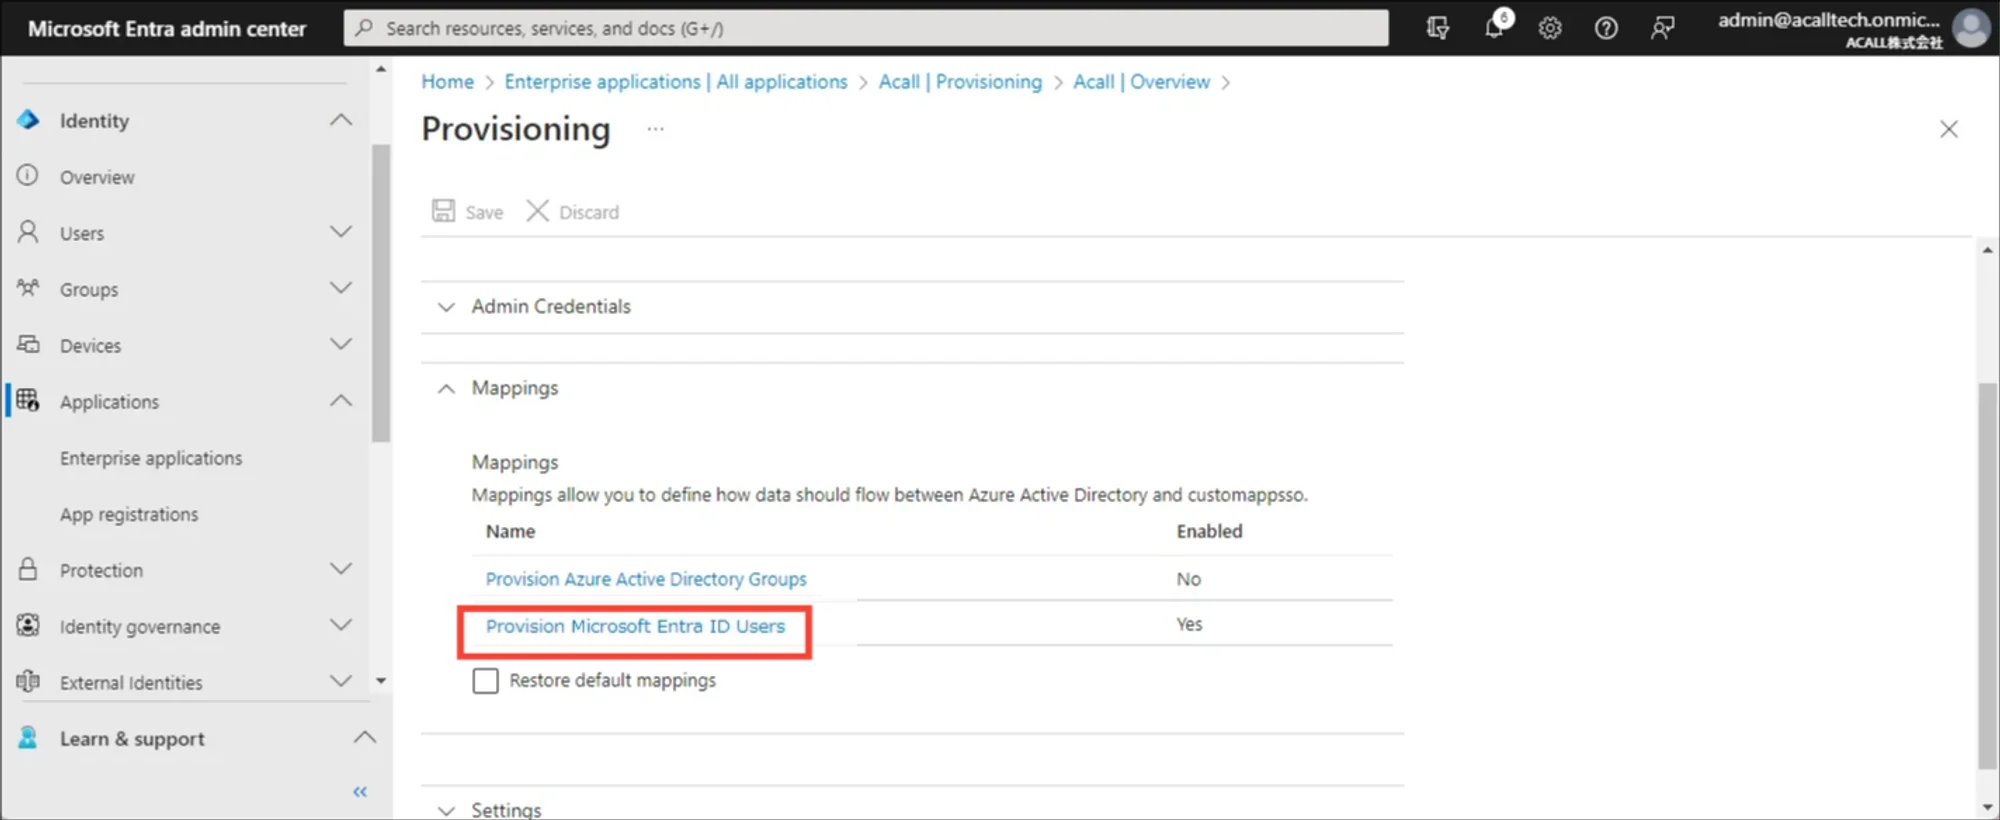
Click [Provision Microsoft Entra ID Users].
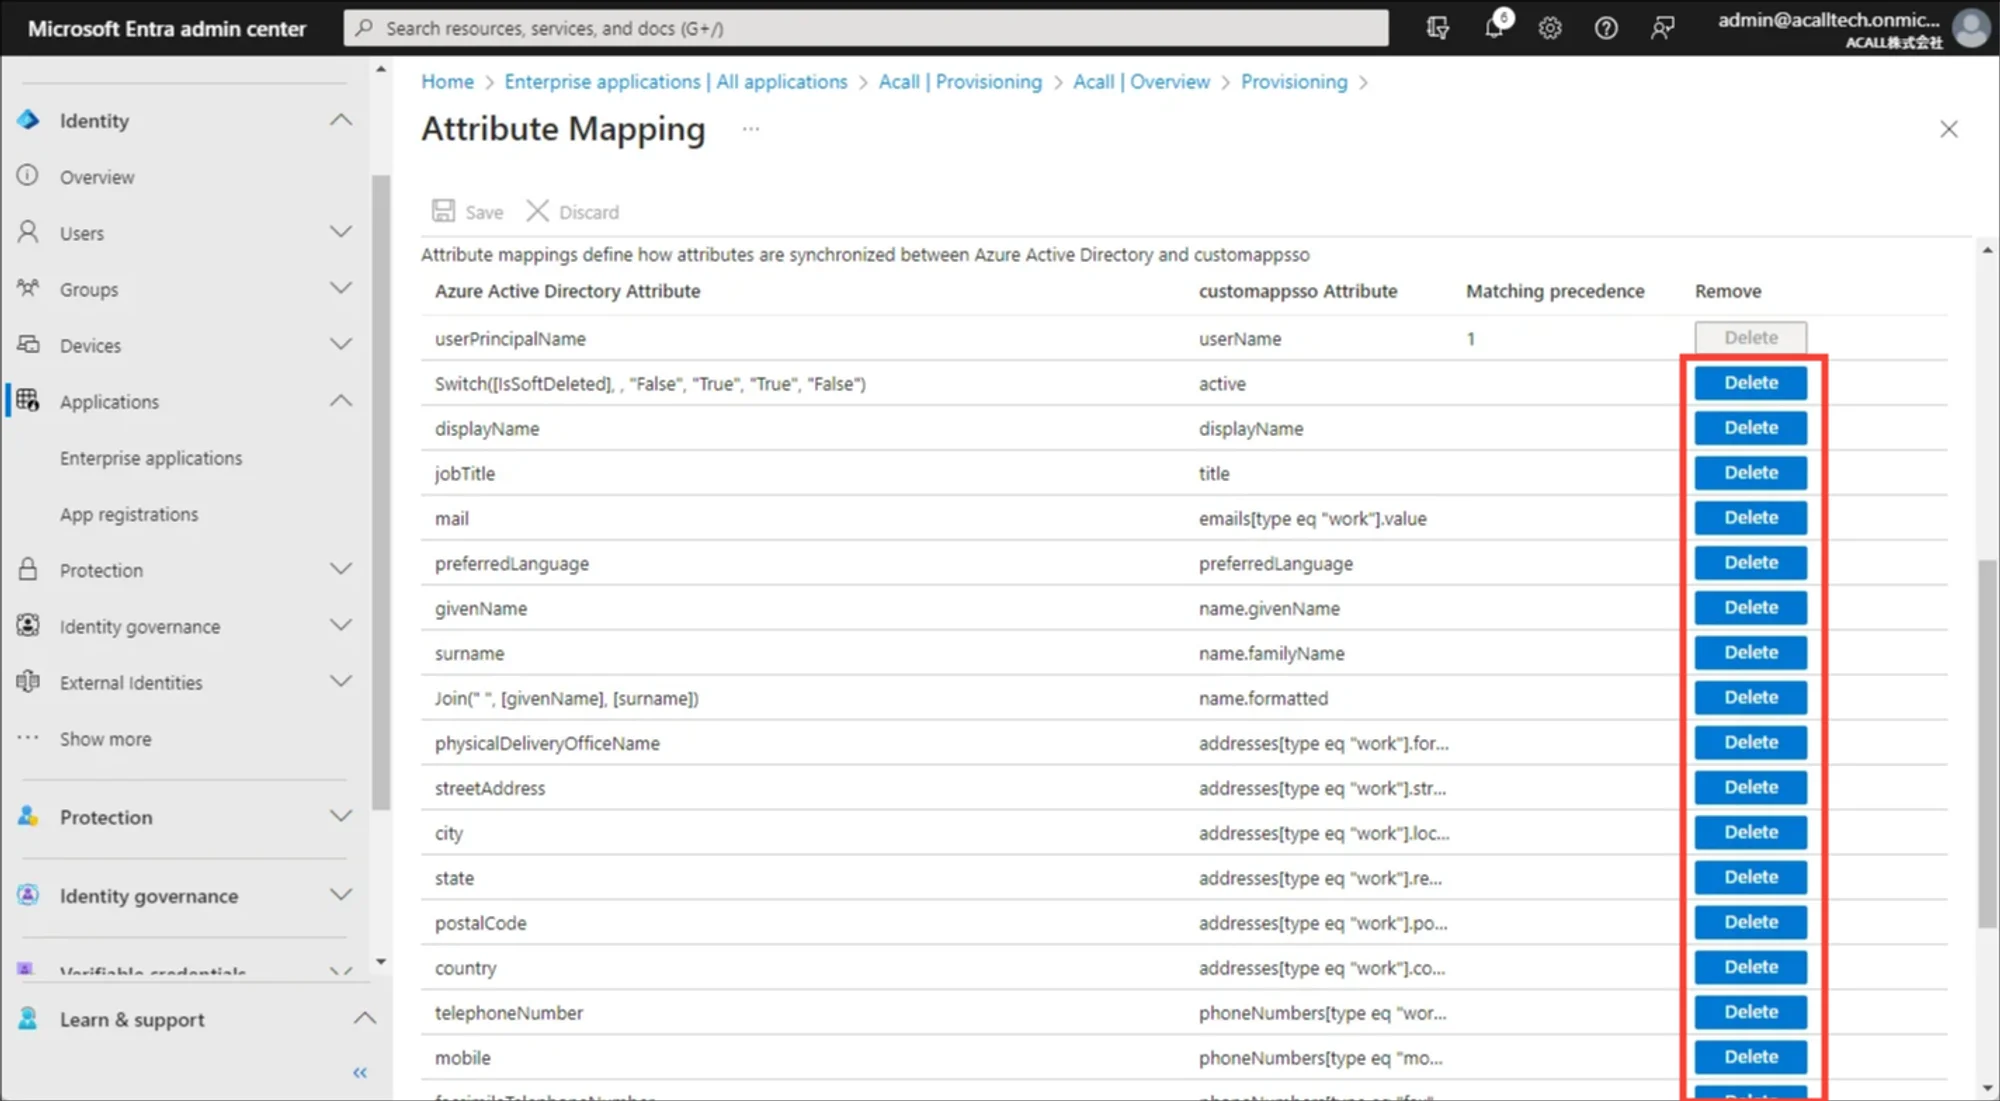
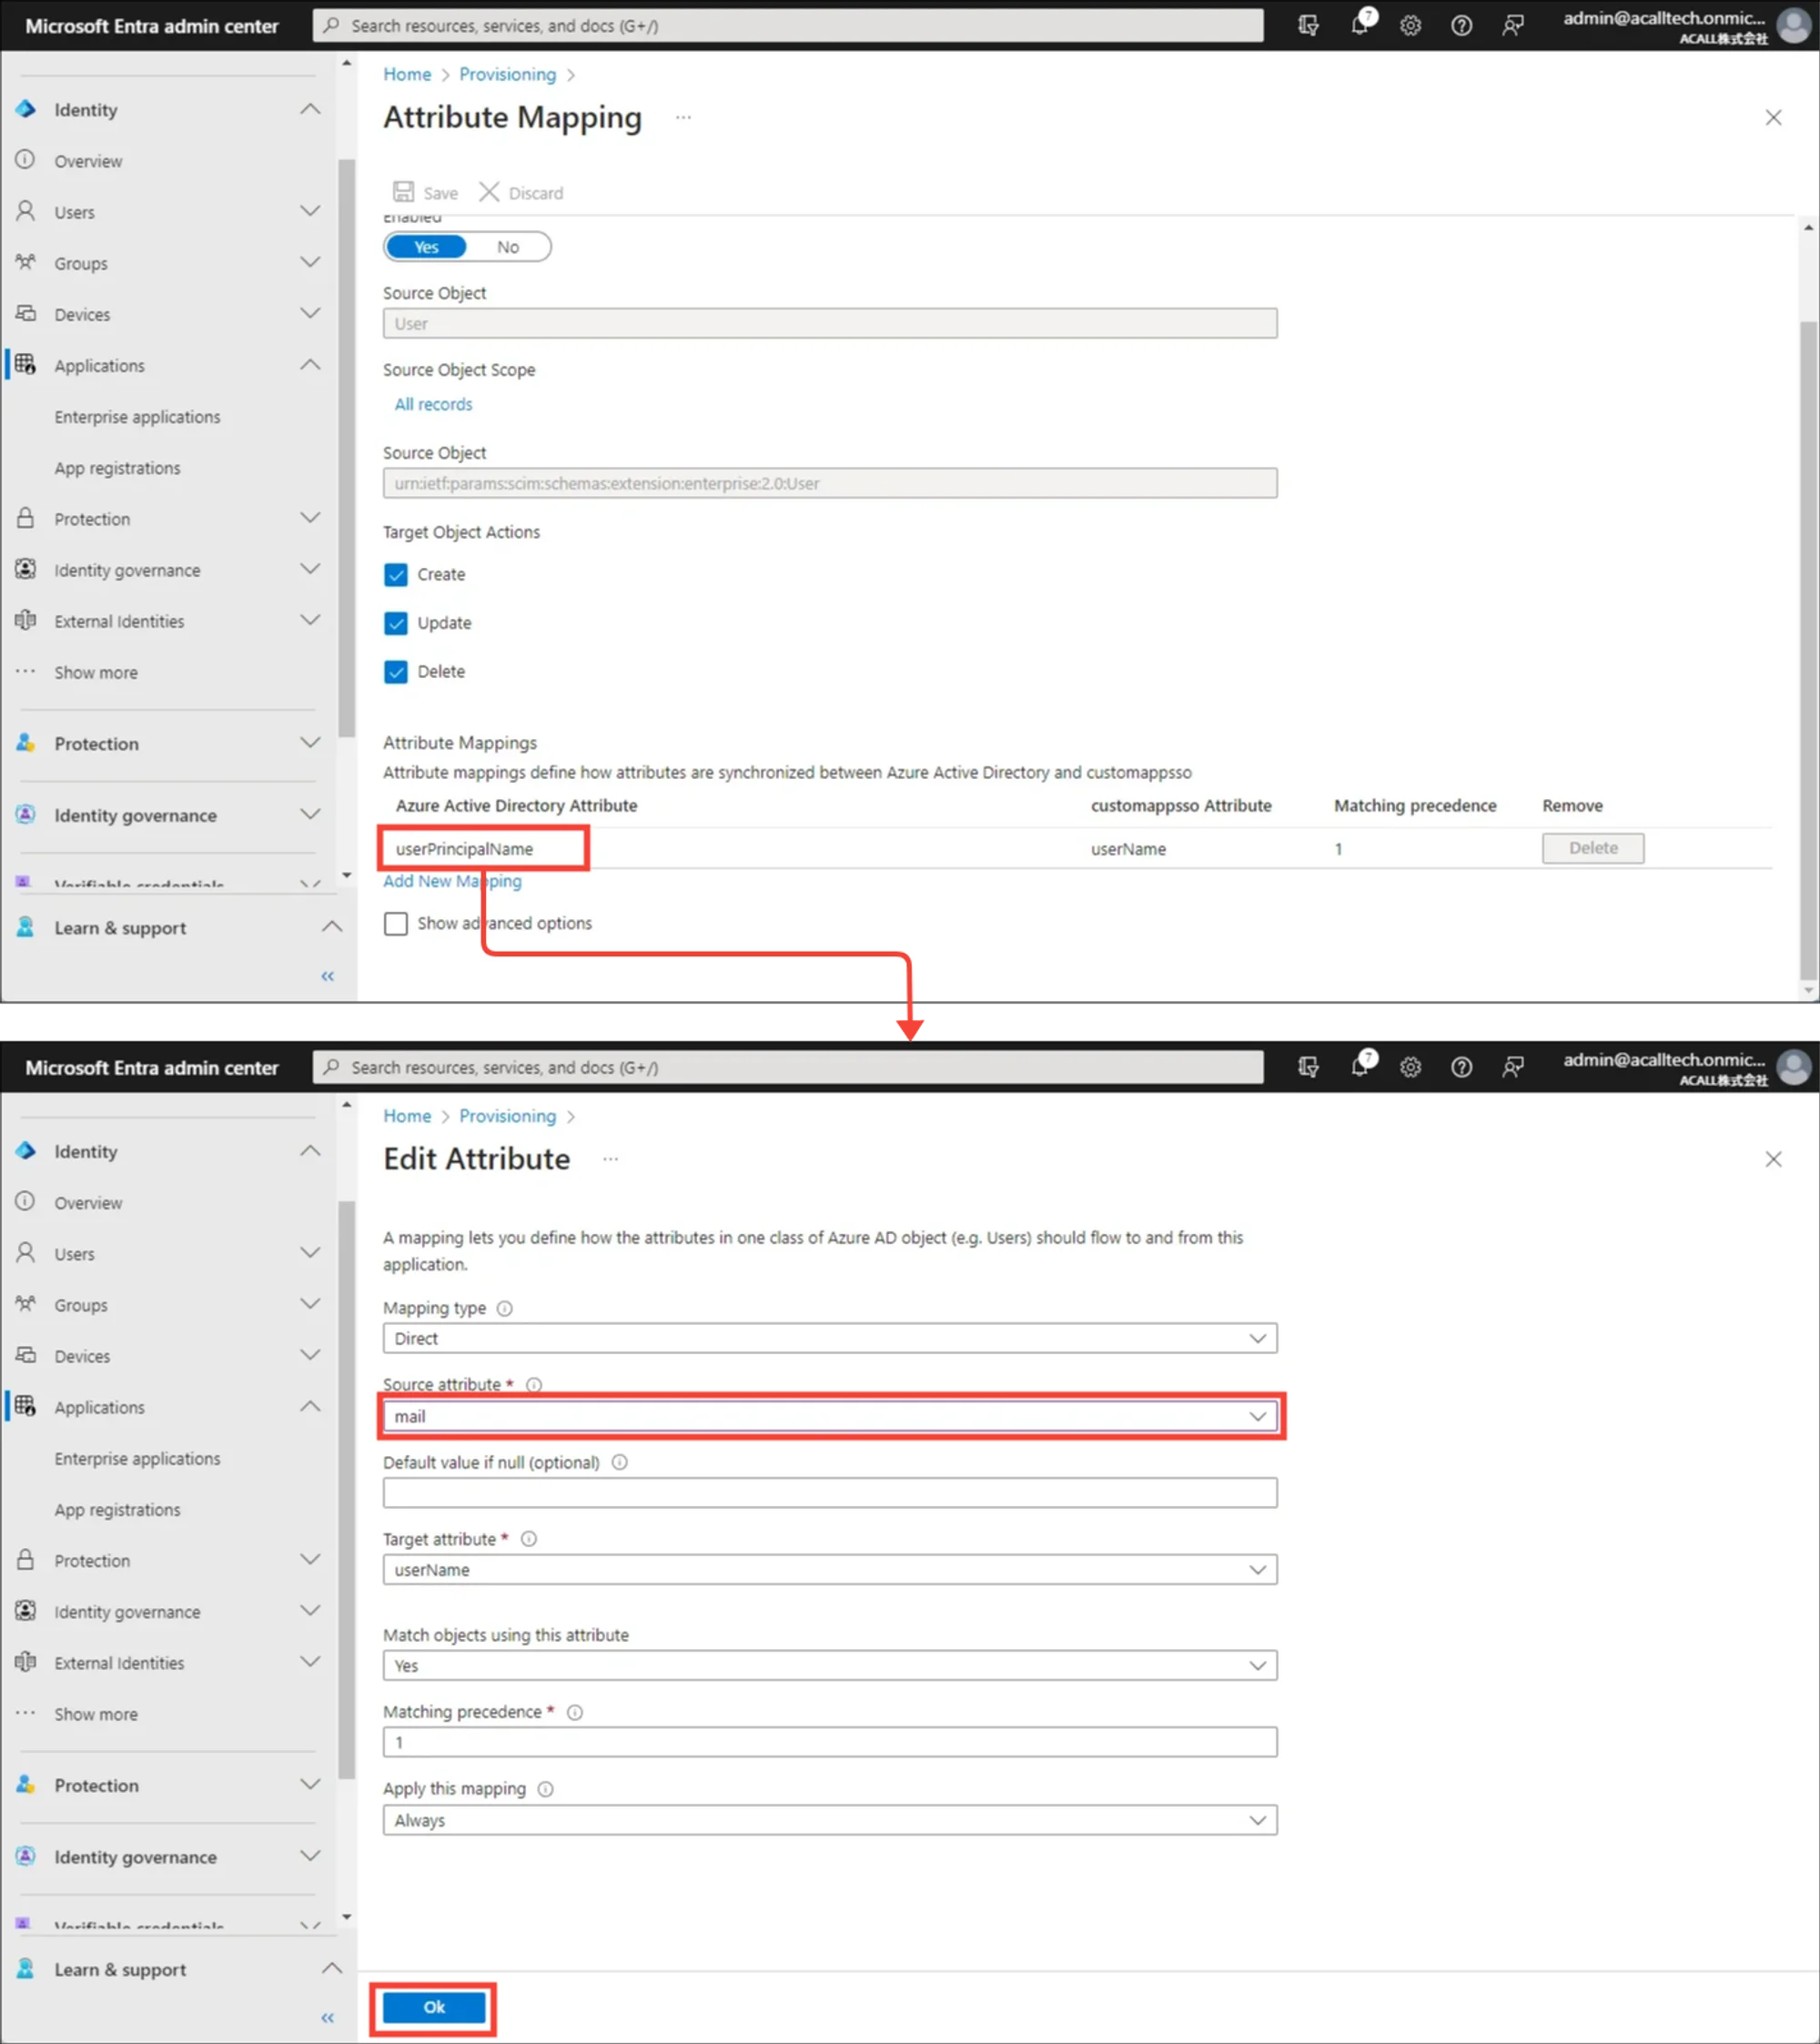
Delete all of the mappings except for ‘userPrincipalName - userName’.
Email Address Mapping
Change Source attribute from ‘userPrincipalName’ to ‘mail’ by editing ‘userPrincipalName - userName’ mapping.
Required Mapping Settings
Click [Add New Mapping].
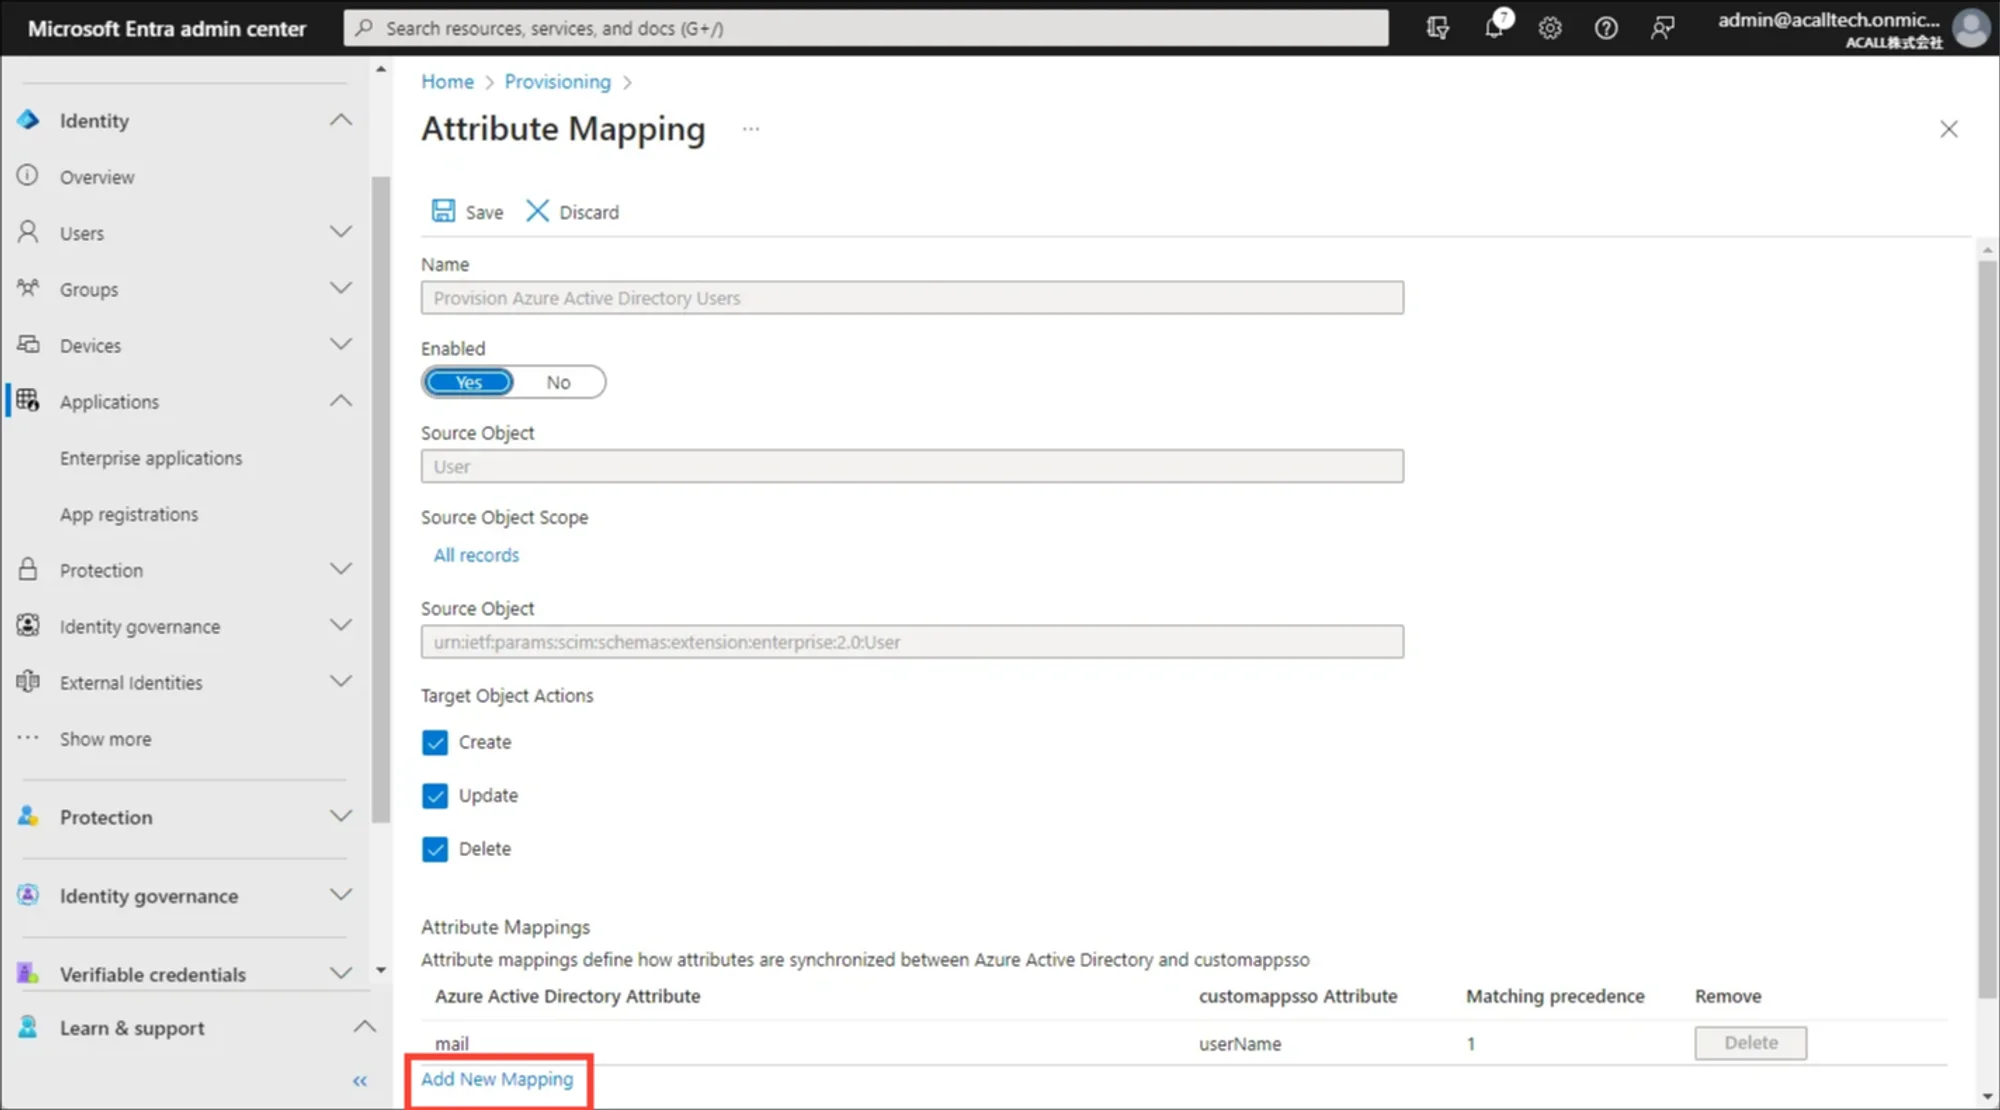
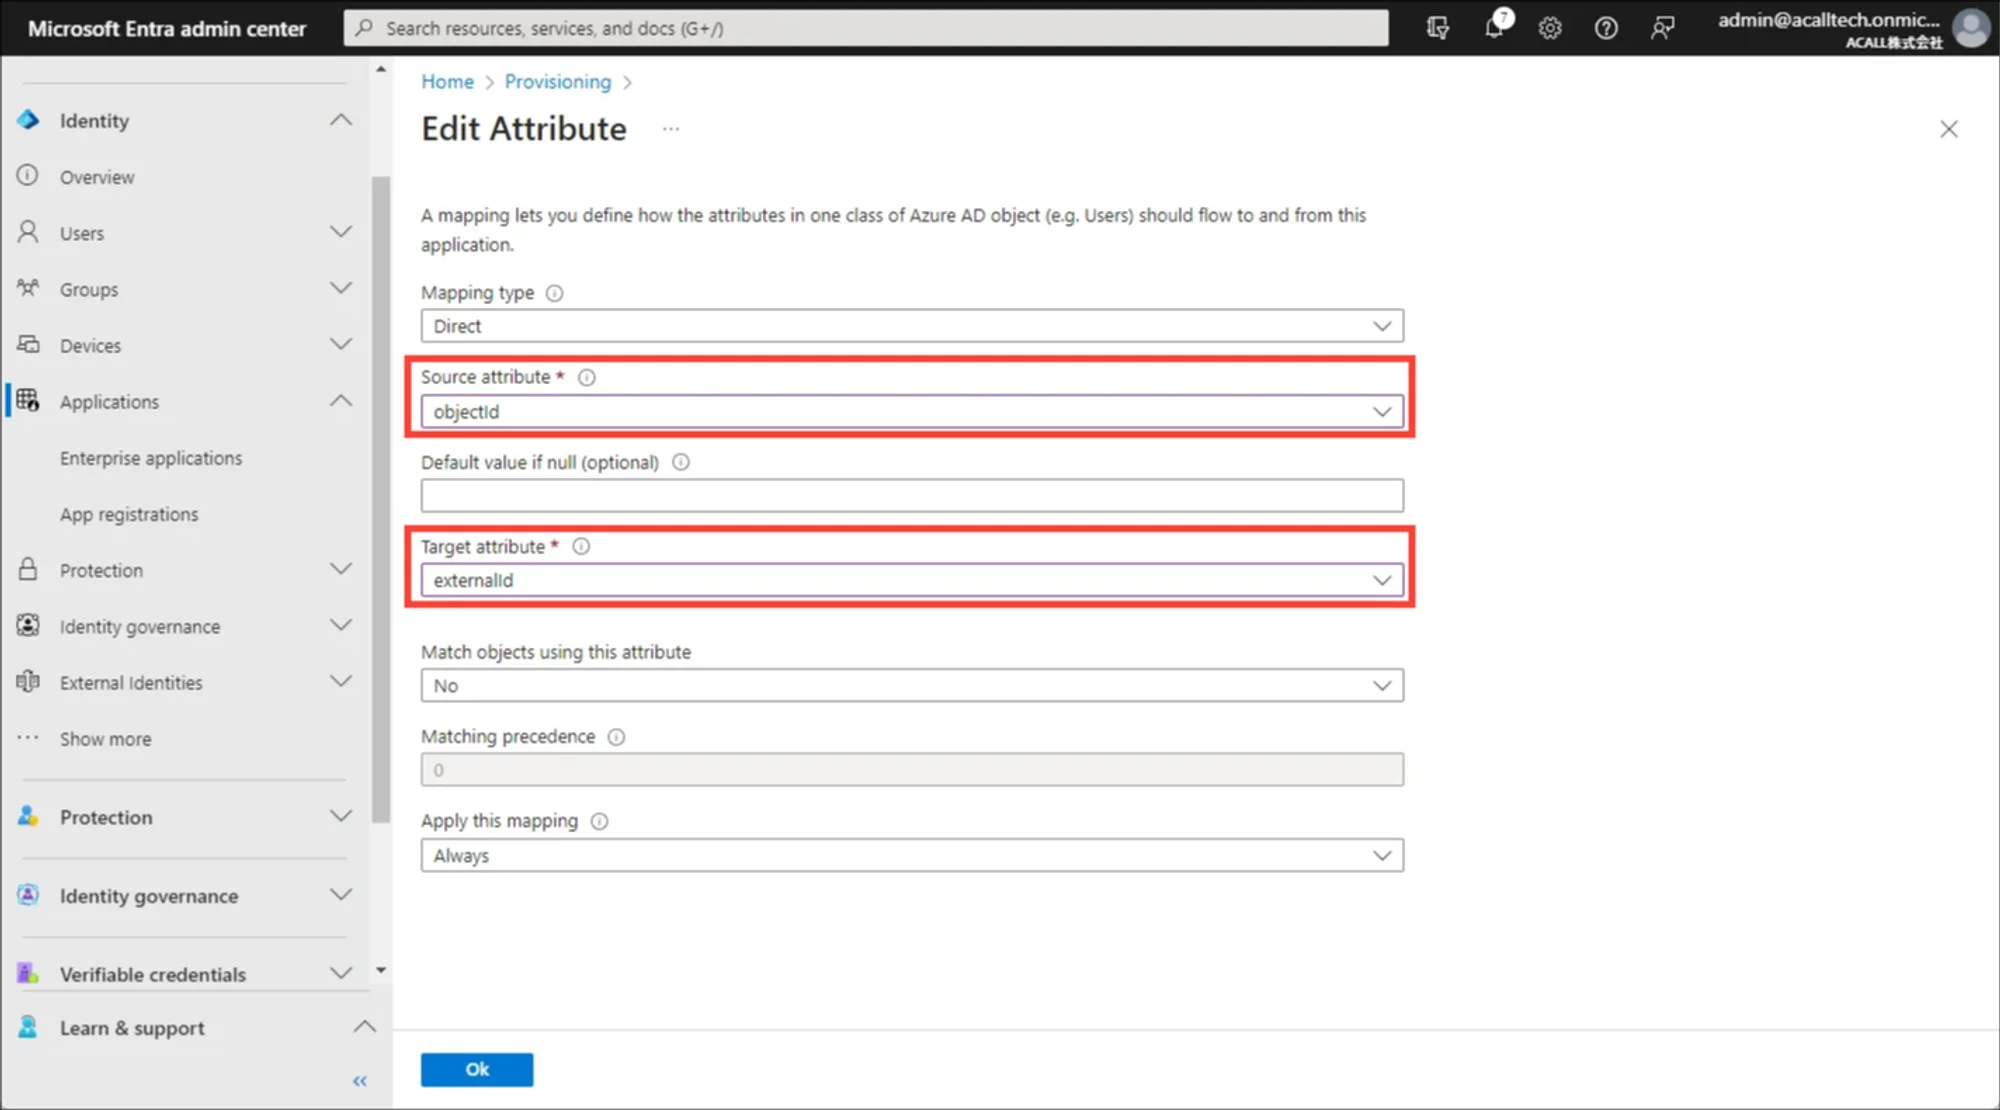
Set up mappings as shown in the tables below.
| <ta" class="simple-table-header-color simple-table-header" style="box-sizing: border-box; padding: 8px; width: 137.898px;">Microsoft Entra ID setting (Mapping types)</ta"> |
Microsoft Entra ID setting Source attribute ( Microsoft Entra ID attribute) |
Microsoft Entra ID setting Target attribute (customappsso attribute) |
Acall attribute |
|---|---|---|---|
| <ta" class="" style="box-sizing: border-box; padding: 8px; width: 137.898px;">Direct</ta"> | objectId | externalId | externalId *User verification key between Microsoft Entra ID and Acall |
| <ta" class="" style="box-sizing: border-box; padding: 8px; width: 137.898px;">Direct</ta"> | surname | name.familyName | surname |
| <ta" class="" style="box-sizing: border-box; padding: 8px; width: 137.898px;">Expression</ta"> | ※1 Active/resigned setting | active | active/resigned |
| <ta" class="" style="box-sizing: border-box; padding: 8px; width: 137.898px;">Expression</ta"> | ※2 Permission setting | roles[primary eq True].value | permission |
※1 Active/resigned setting
Enter as below.
Switch([IsSoftDeleted], , "False", "True", "True","False")
 Note

This setting is for changing user’s status as resigned in Acall when any of the following changes are applied.

・Application assignments were removed

・Delete account

・Disable account (block sign-in)
※2 Permission setting
Enter “userPrincipalName” of the user whom you wish to give admin permission (admin) as below. If the number of administrators changes after go-live, you need to change Expression each time.
Switch([userPrincipalName], "general","【upn1】", "admin", "【upn2】", "admin")
Setting 2 users "admin1@example.com" and "admin2@example.com" as admin.
Switch([userPrincipalName], "general", "admin1@example.com", "admin", "admin2@example.com",admin)
If you use Multi-tenant feature, give tenant admin permission to ‘tenant_admin’.
Setting "admin1@example.com" as tenant admin and "admin2@example.com" as admin.
Switch([userPrincipalName], "general", "admin1@example.com", "tenant_admin", "admin2@example.com",admin)
Additional setting is needed to complete setting up “tenant_admin”. Please contact Acall via contact form if the number of tenant administrators changes after go-live.
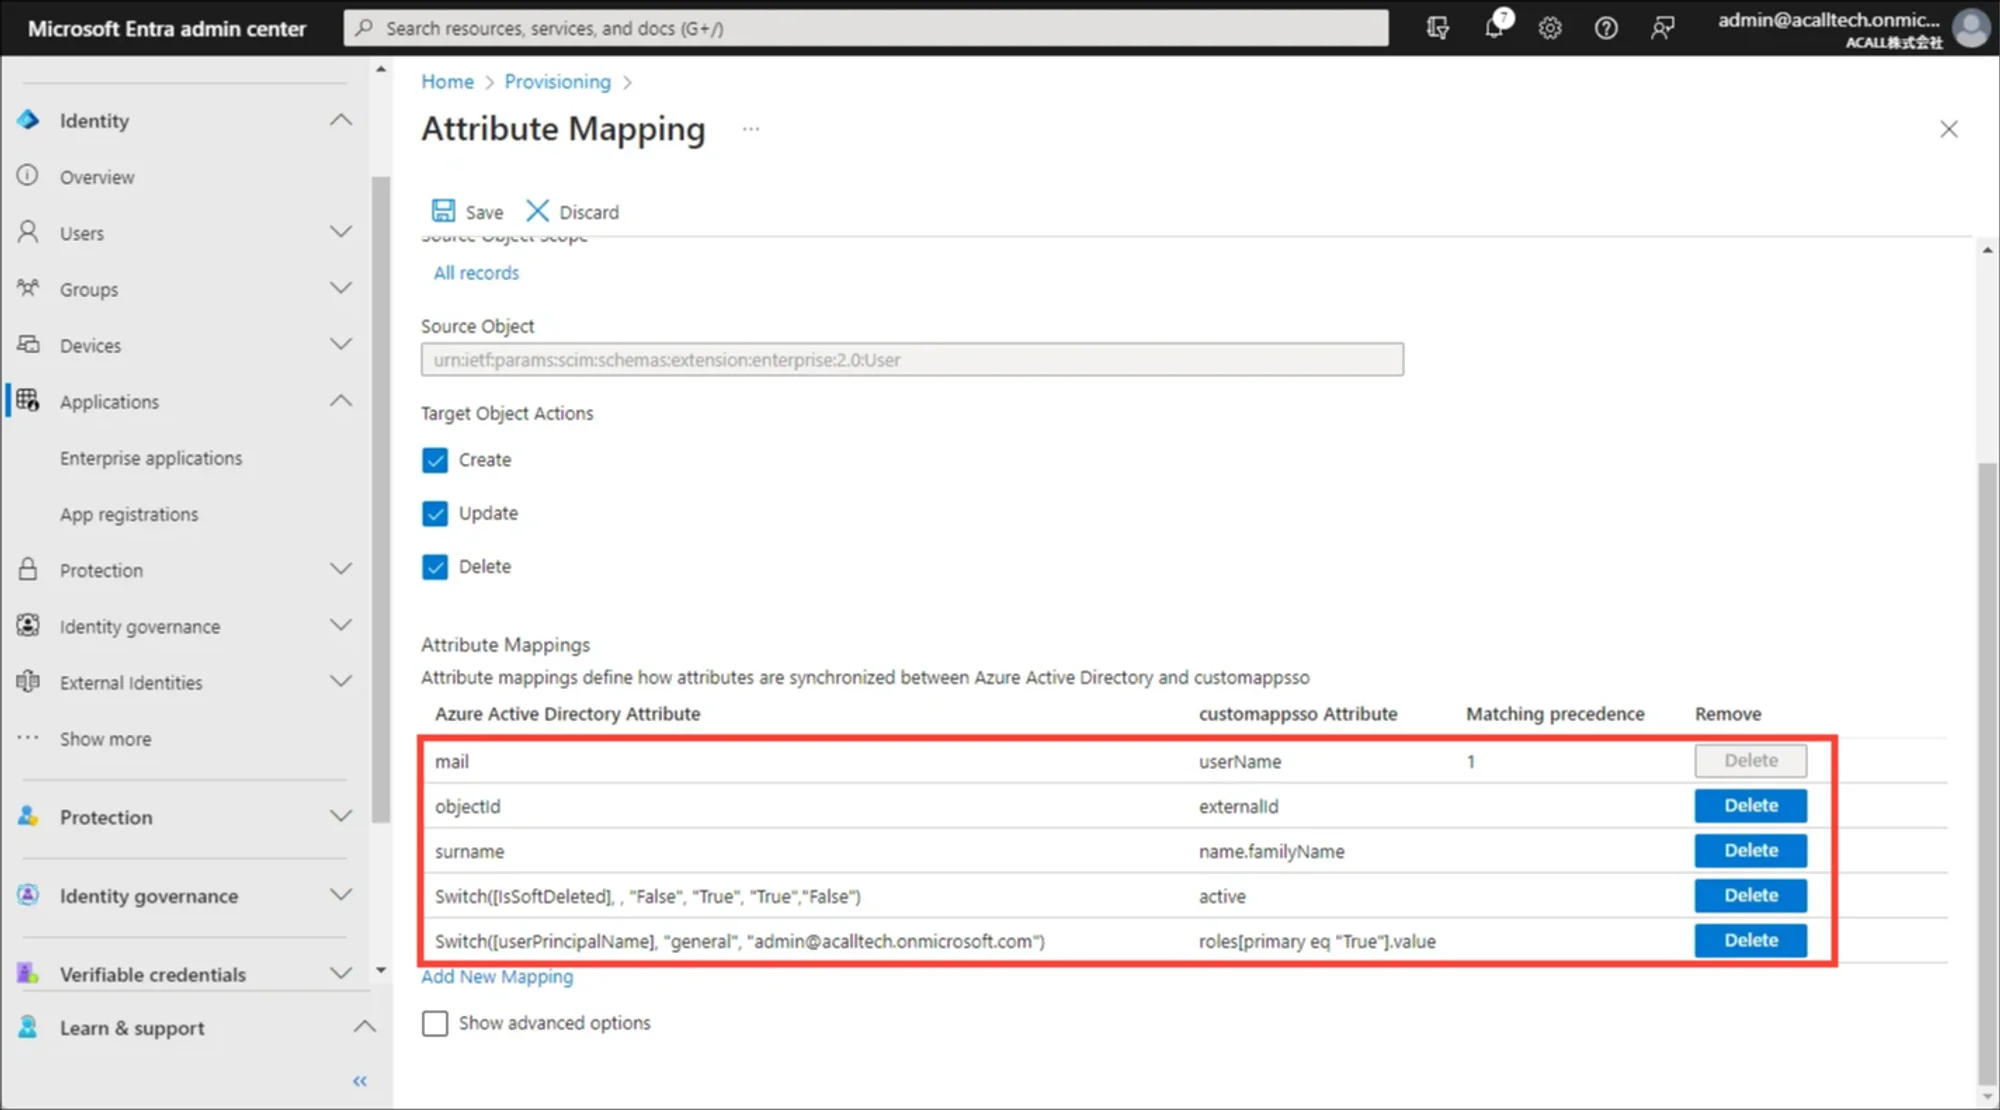
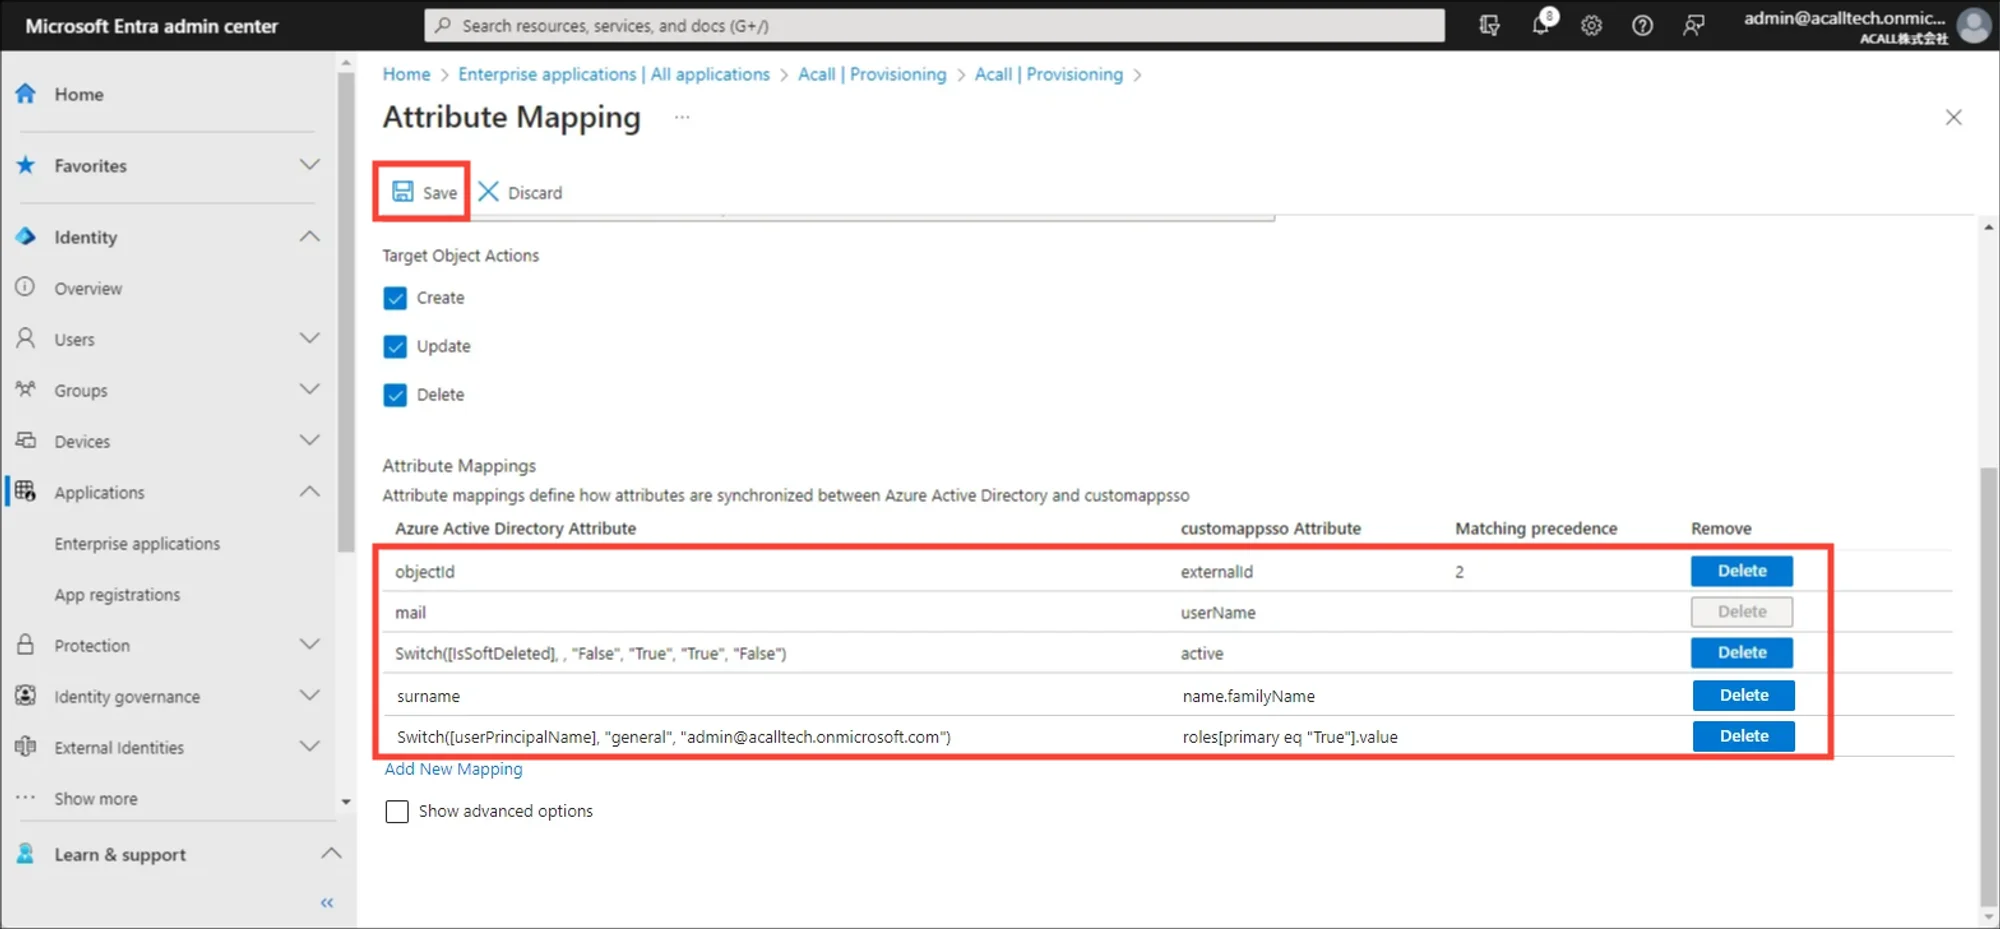
If the required settings are correctly done, Attribute mapping setting would look like below.
Optional Mapping Settings
Set the following mappings to the attributes you wish to use in Acall.
| Microsoft Entra ID setting (Mapping types) |
Microsoft Entra ID setting Source attribute (Microsoft Entra ID attribute) |
Microsoft Entra ID setting Target attribute (customappsso attribute) |
Acall attribute |
|---|---|---|---|
| Direct | givenName | name.givenName | Given name |
| Direct | displayName | displayName | Display name |
| Direct | mobile | phoneNumbers[type eq mobile].value | Phone number for SMS |
| Direct | telephoneNumber | phoneNumbers[type eq work].value | Extension phone number |
| Direct | mobile | phoneNumbers[type eq sms].value ※2 need to add cusomappsso attribute in advance |
Voice call phone number |
| Direct | accounts[type eq google].value ※2 need to add cusomappsso attribute in advance |
Google Workspace account | |
| Direct | accounts[type eq slack].value ※2 need to add cusomappsso attribute in advance |
Slack user ID | |
| Direct | ※1 | urn:ietf:params:scim:schemas:extension:wsos:2.0: User.additionalInformation |
Additional information |
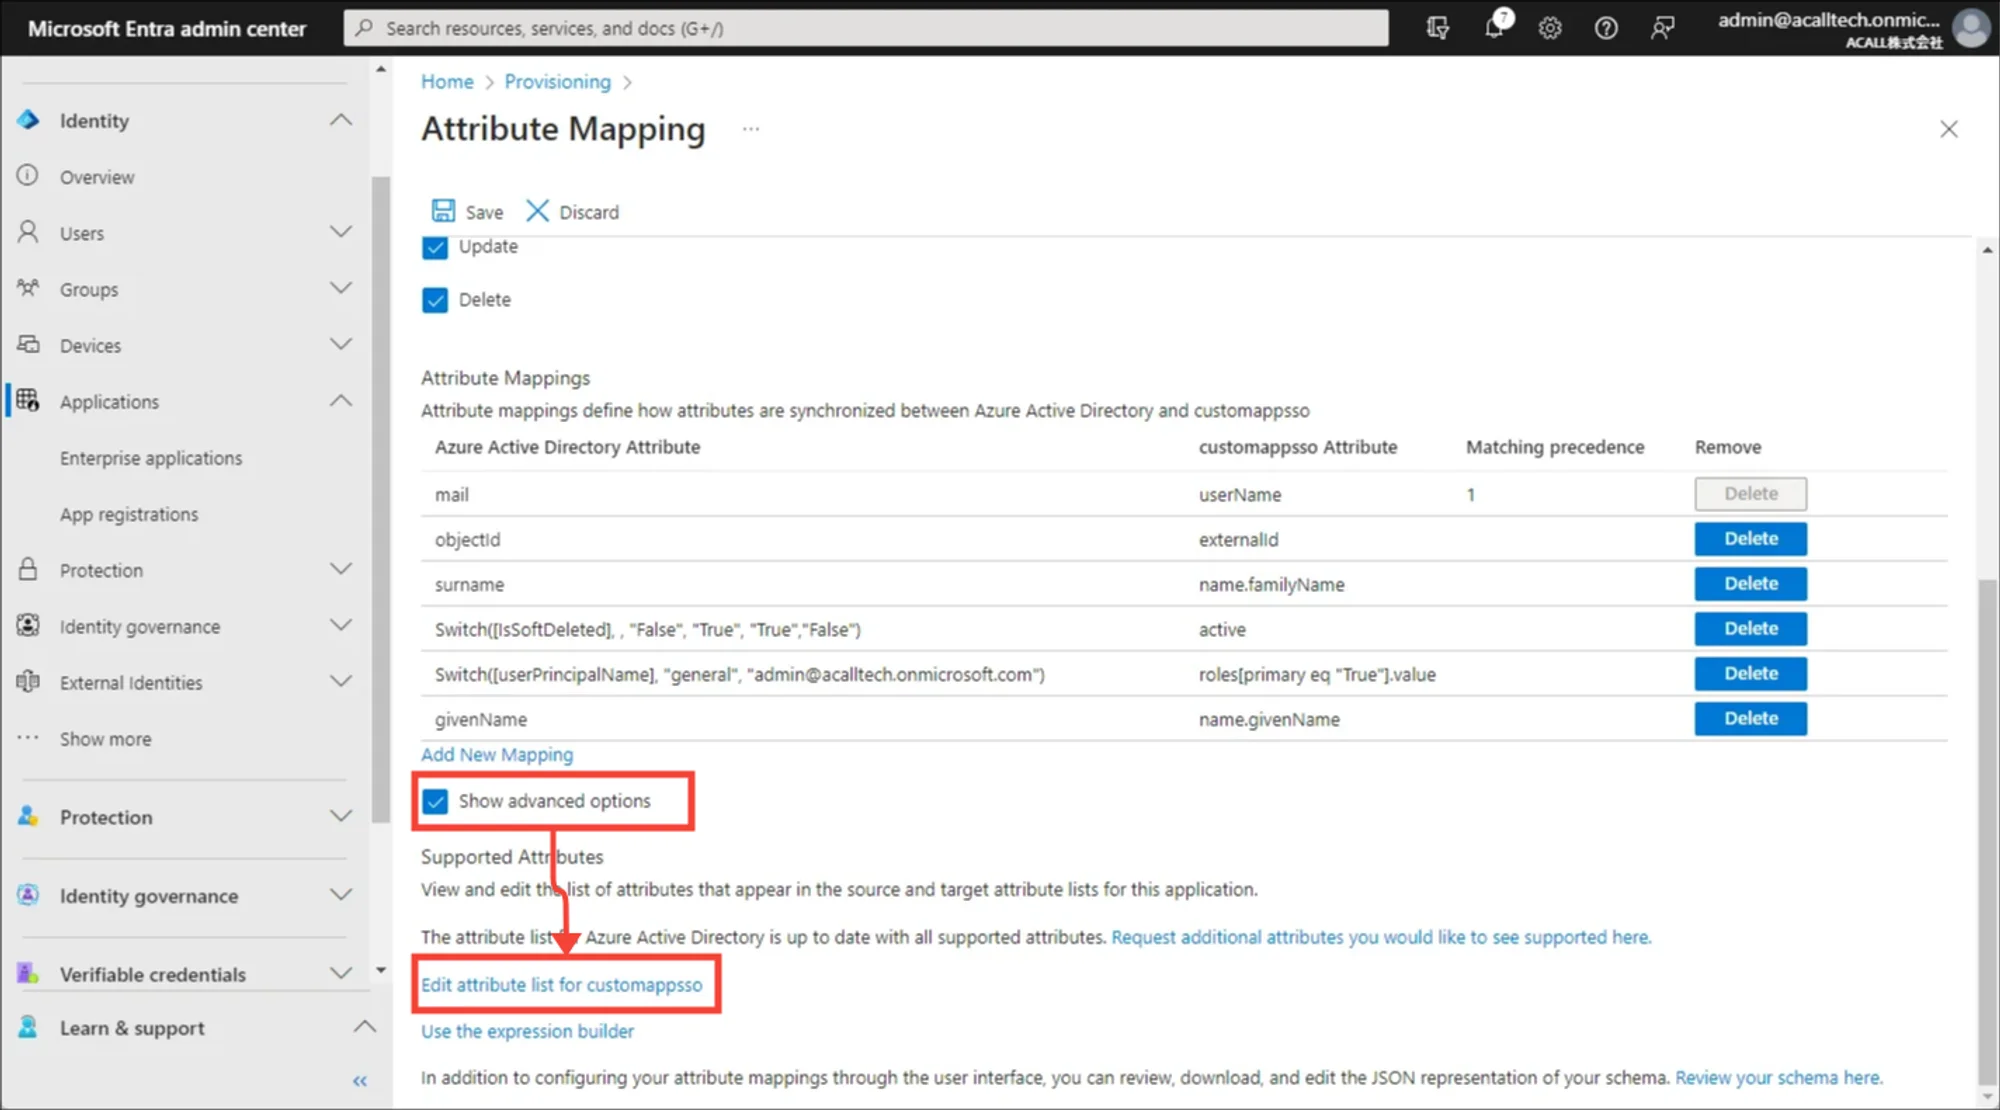
※1 Add customappsso attribute
Since ‘target attribute’ is not registered in Microsoft Entra ID, you need to add attribute.
Check [Show advanced options] box and click [Edit attribute list for customappsso]
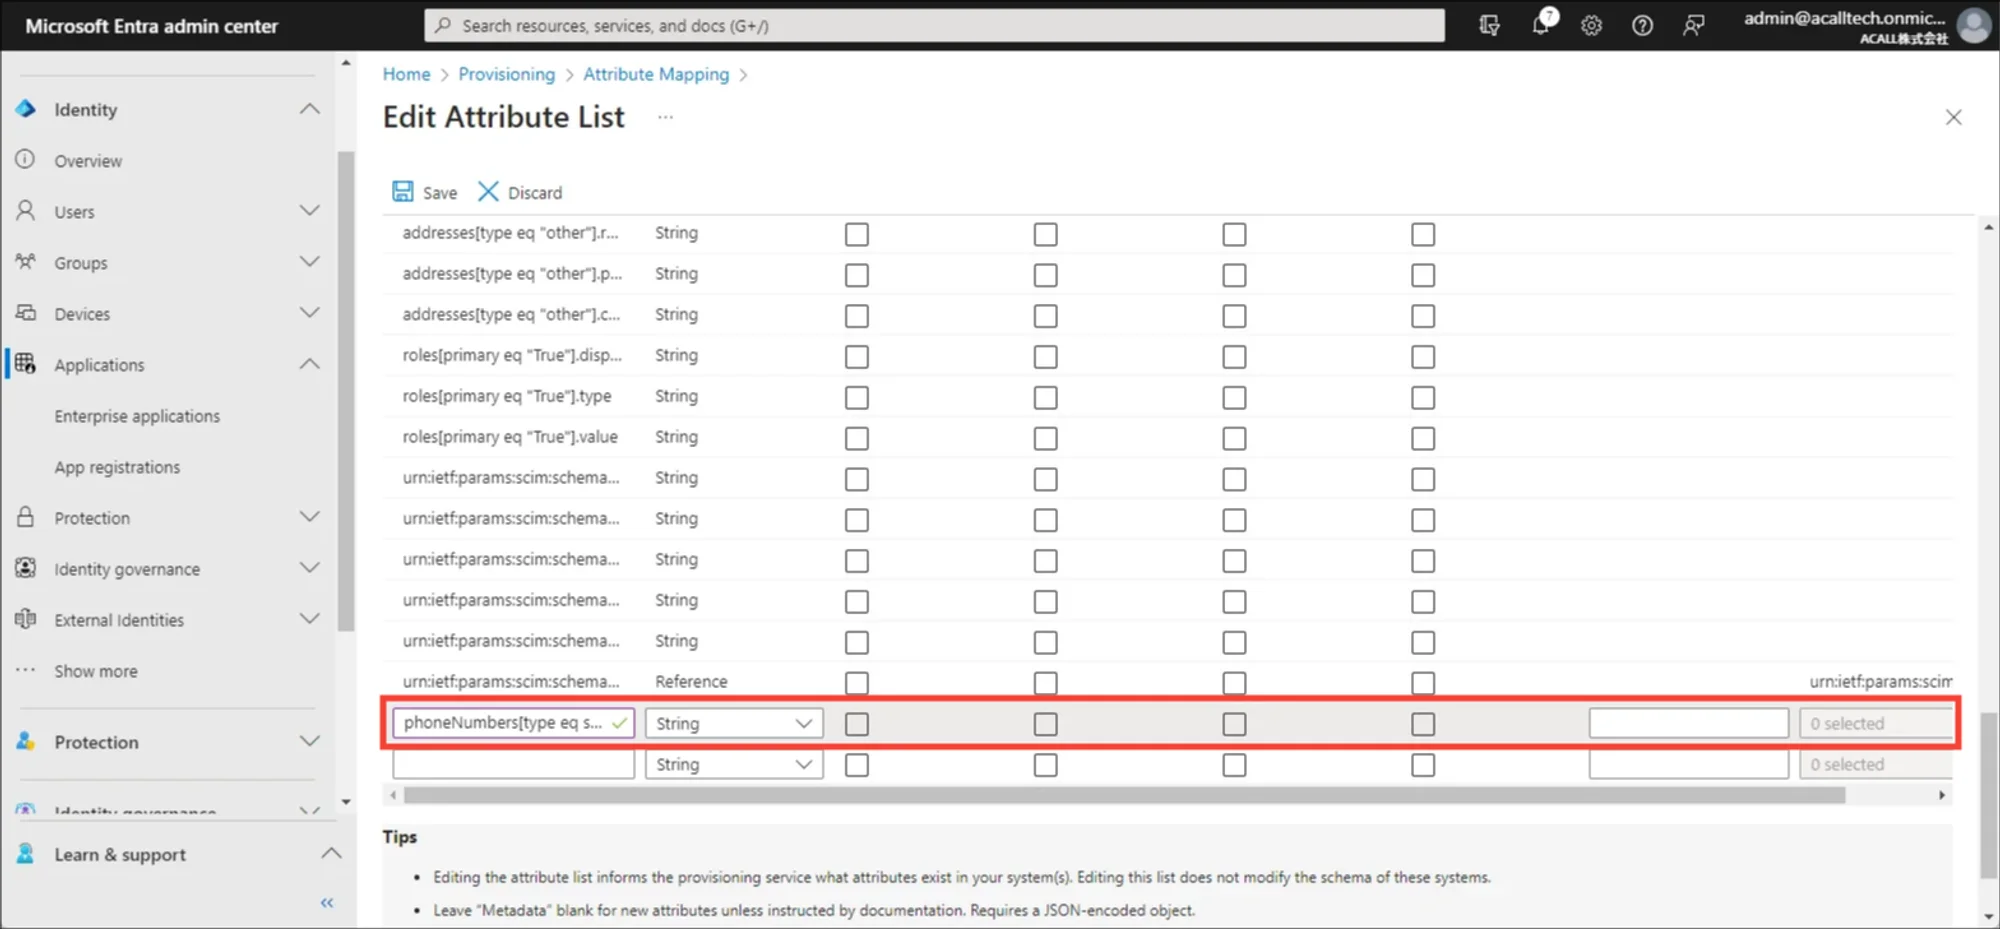
Enter target attribute in ‘Name’ and Save.
Setup Key Attributes For User Matching
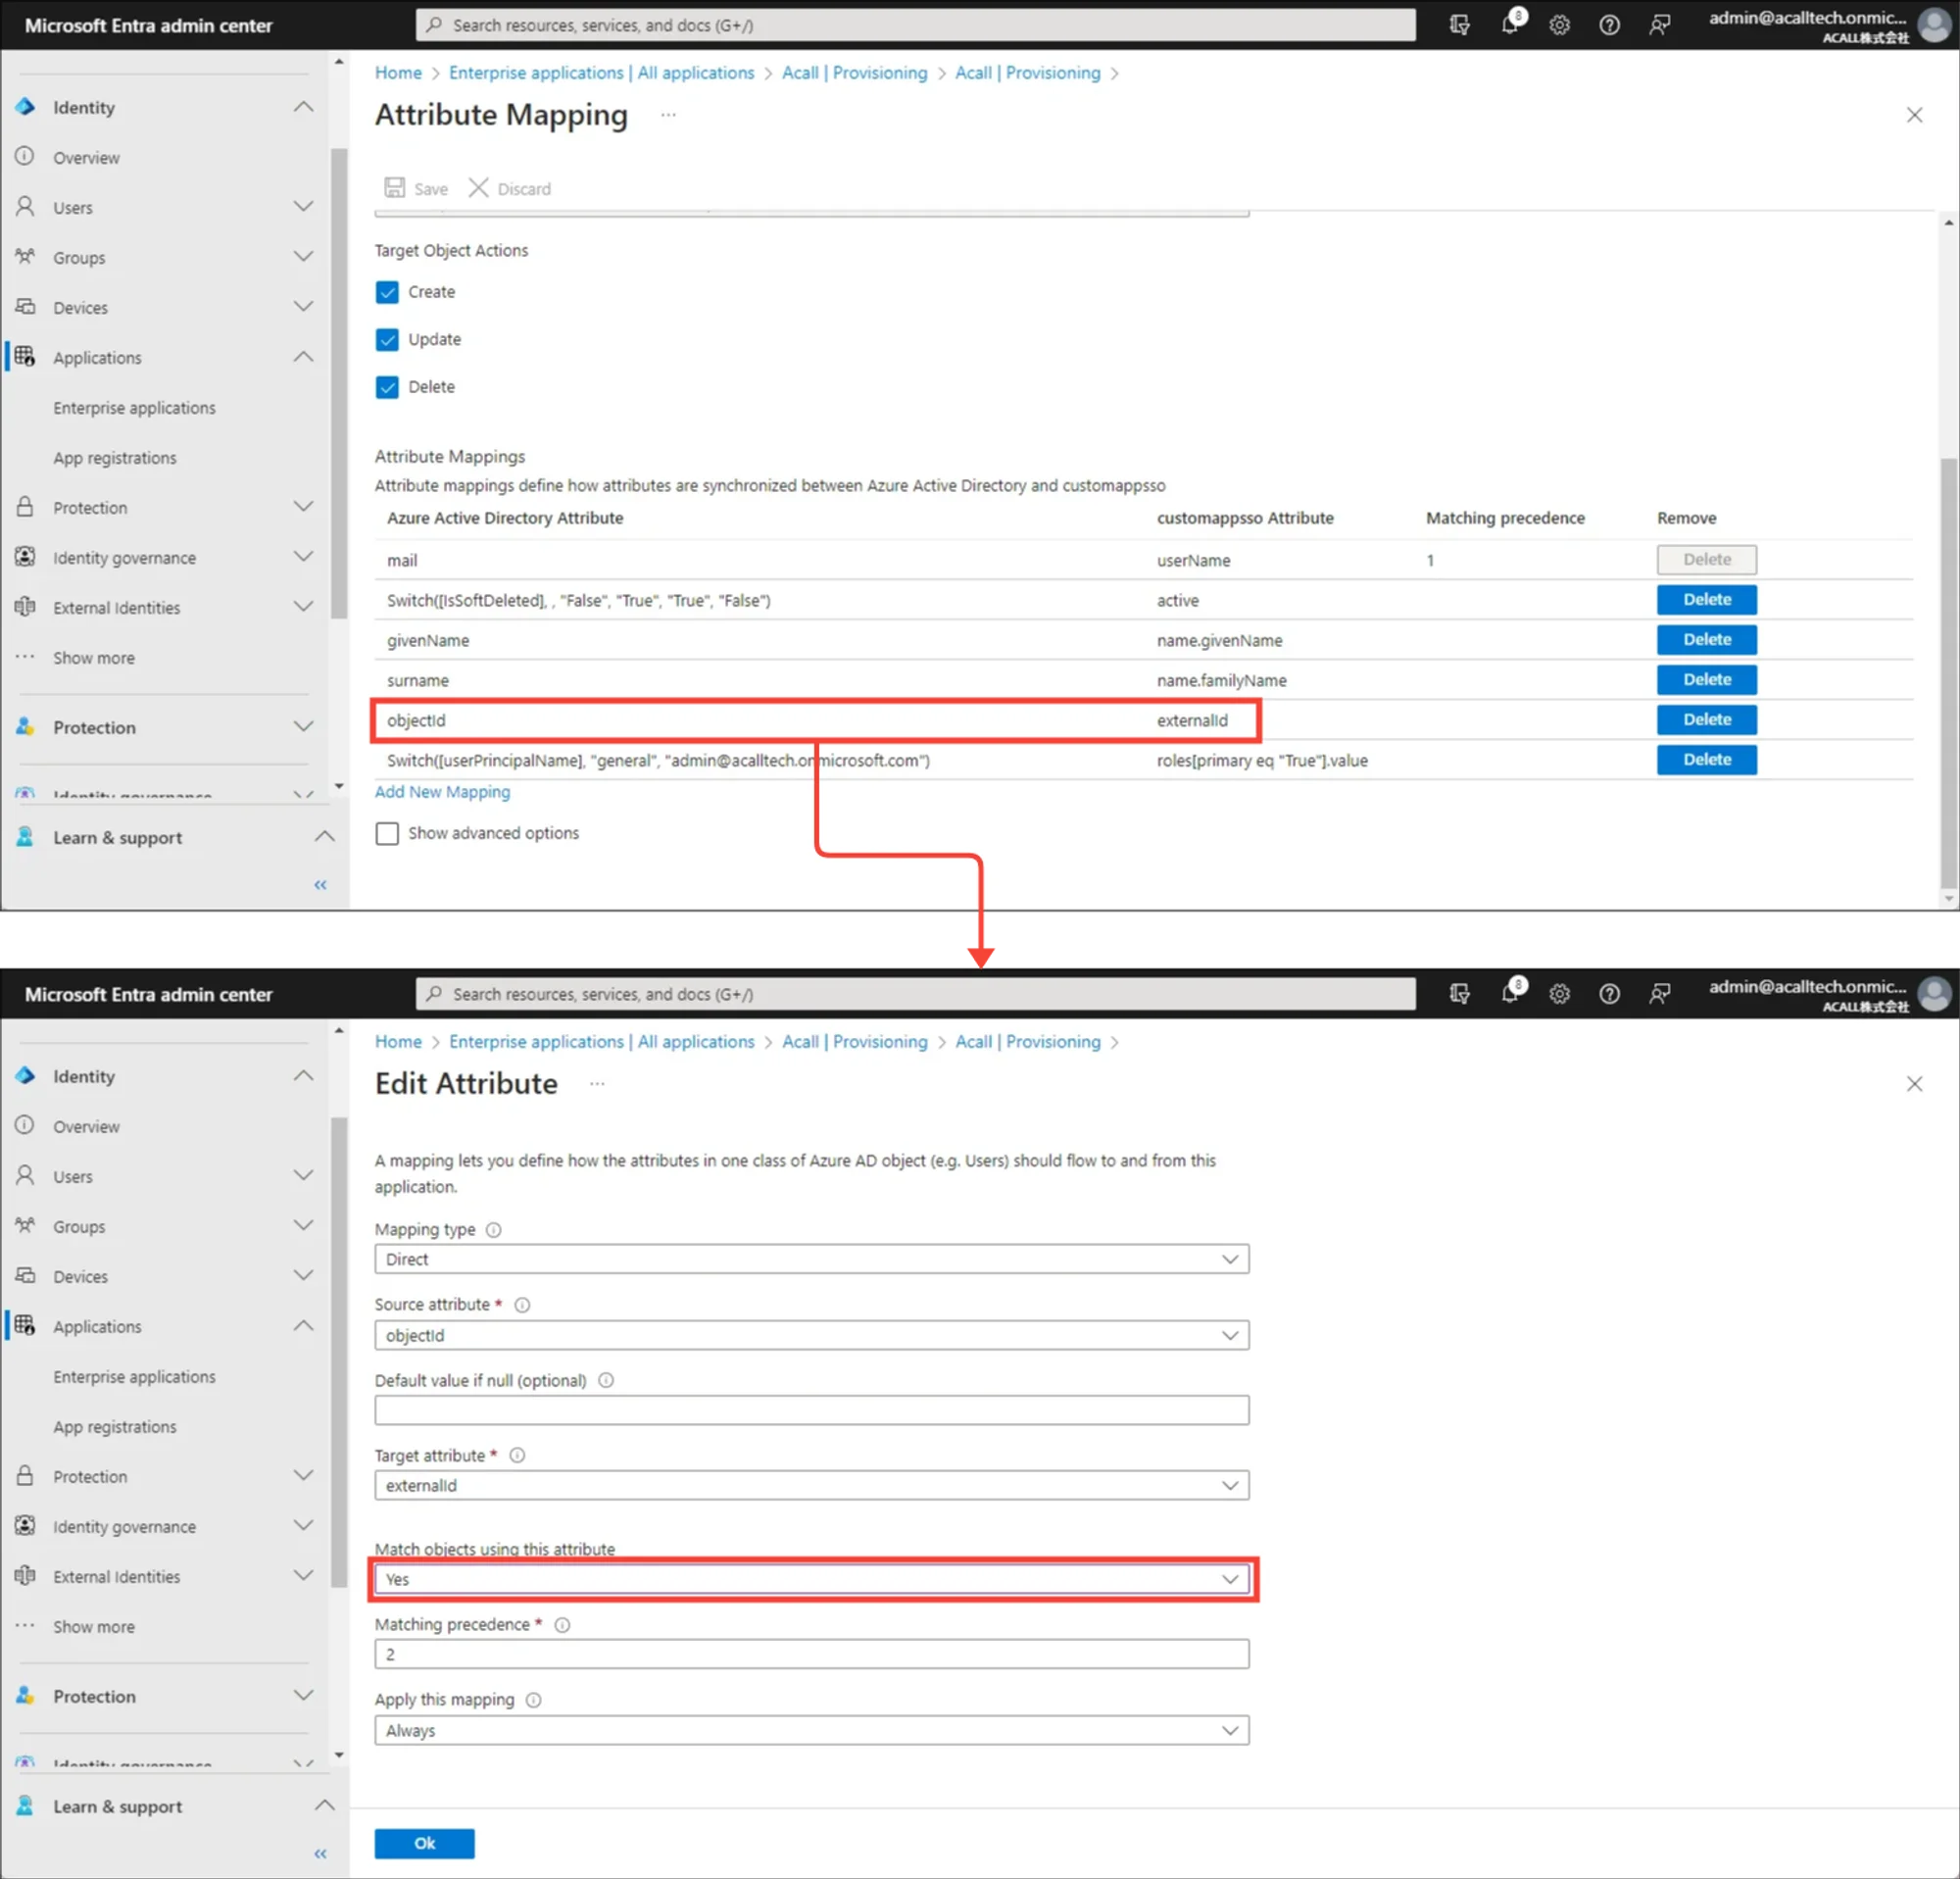
Set ‘externalId - objectId’ attribute as the key for user matching in order to match Microsoft Entra ID users with Acall workers on a 1:1 basis.
If there is workers registered in Acall already, skip to the next step "Start Provisioning" . Once synchronization process for provisioning is successfully done, proceed this step.
Edit ‘externalId - objectId’. Select “Yes” from “Match objects using this attribute” dropdown and click [OK].
Edit ‘mail - userName’ or ‘userPrincipalName - userName’ mapping.
Select “No” from “Match objects using this attribute” dropdown and click [OK].
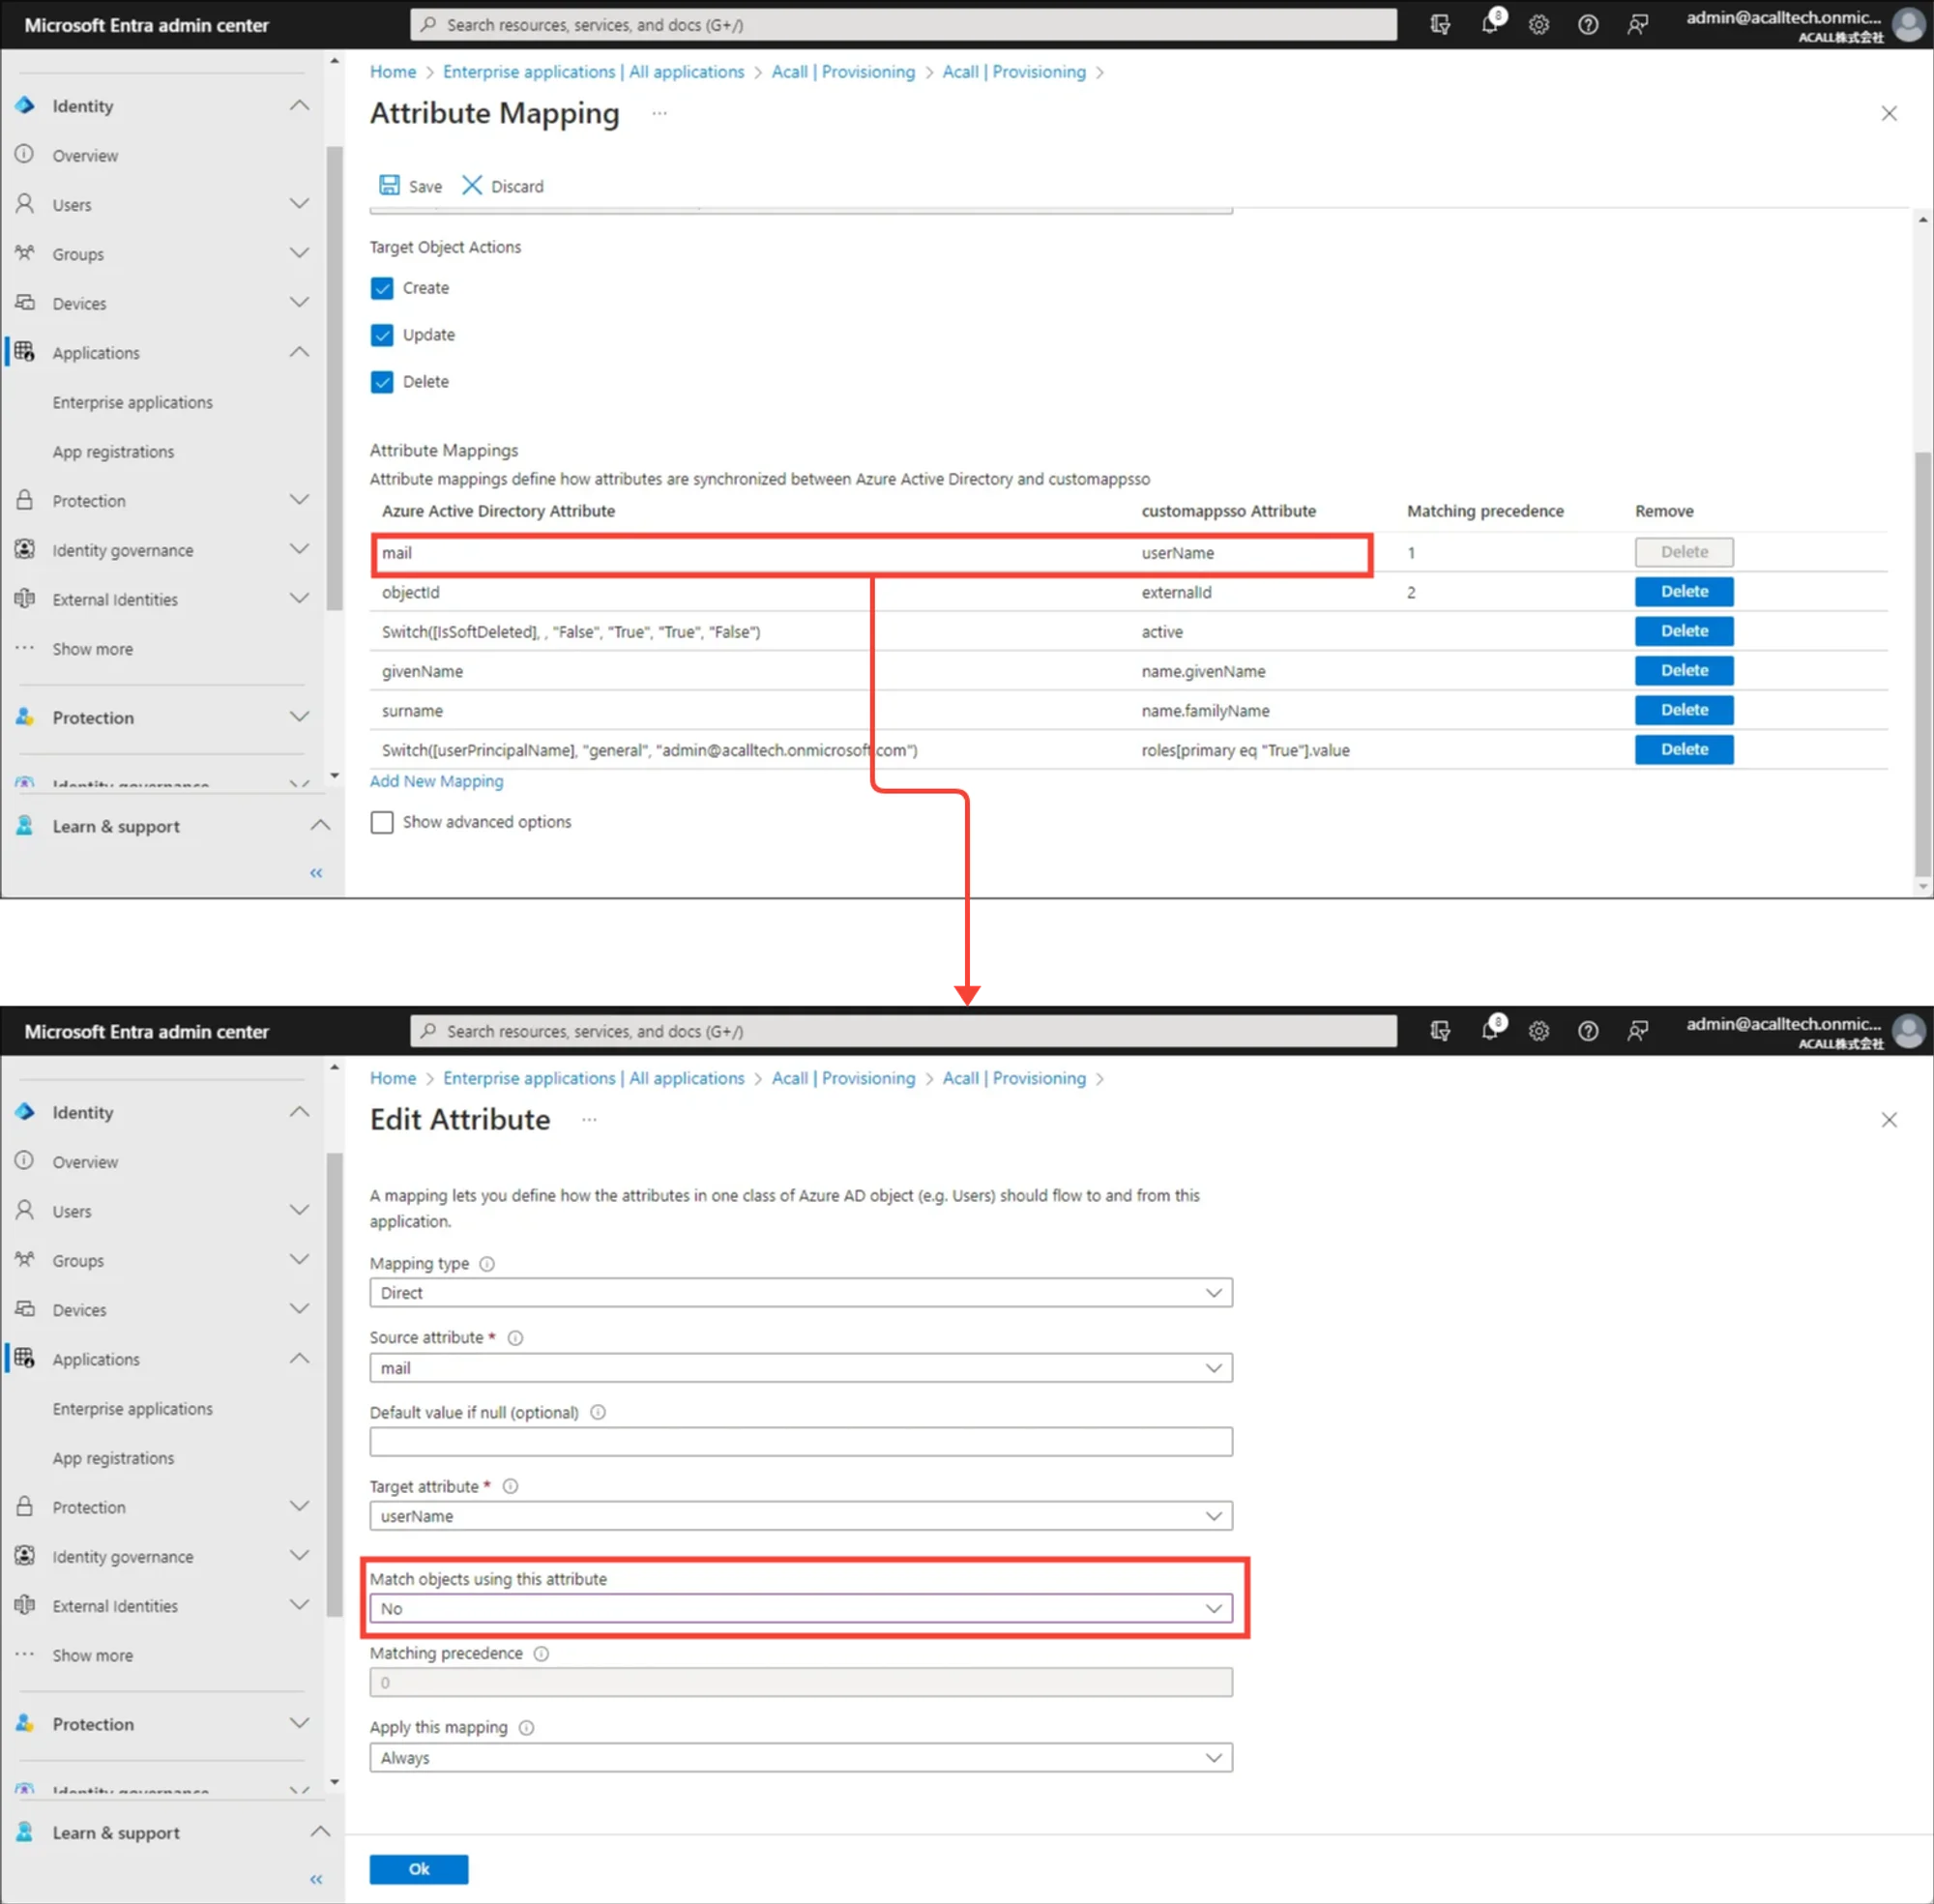
If the settings are correctly done, Attribute Mapping setting would look like the screenshot below.
Start Provisioning
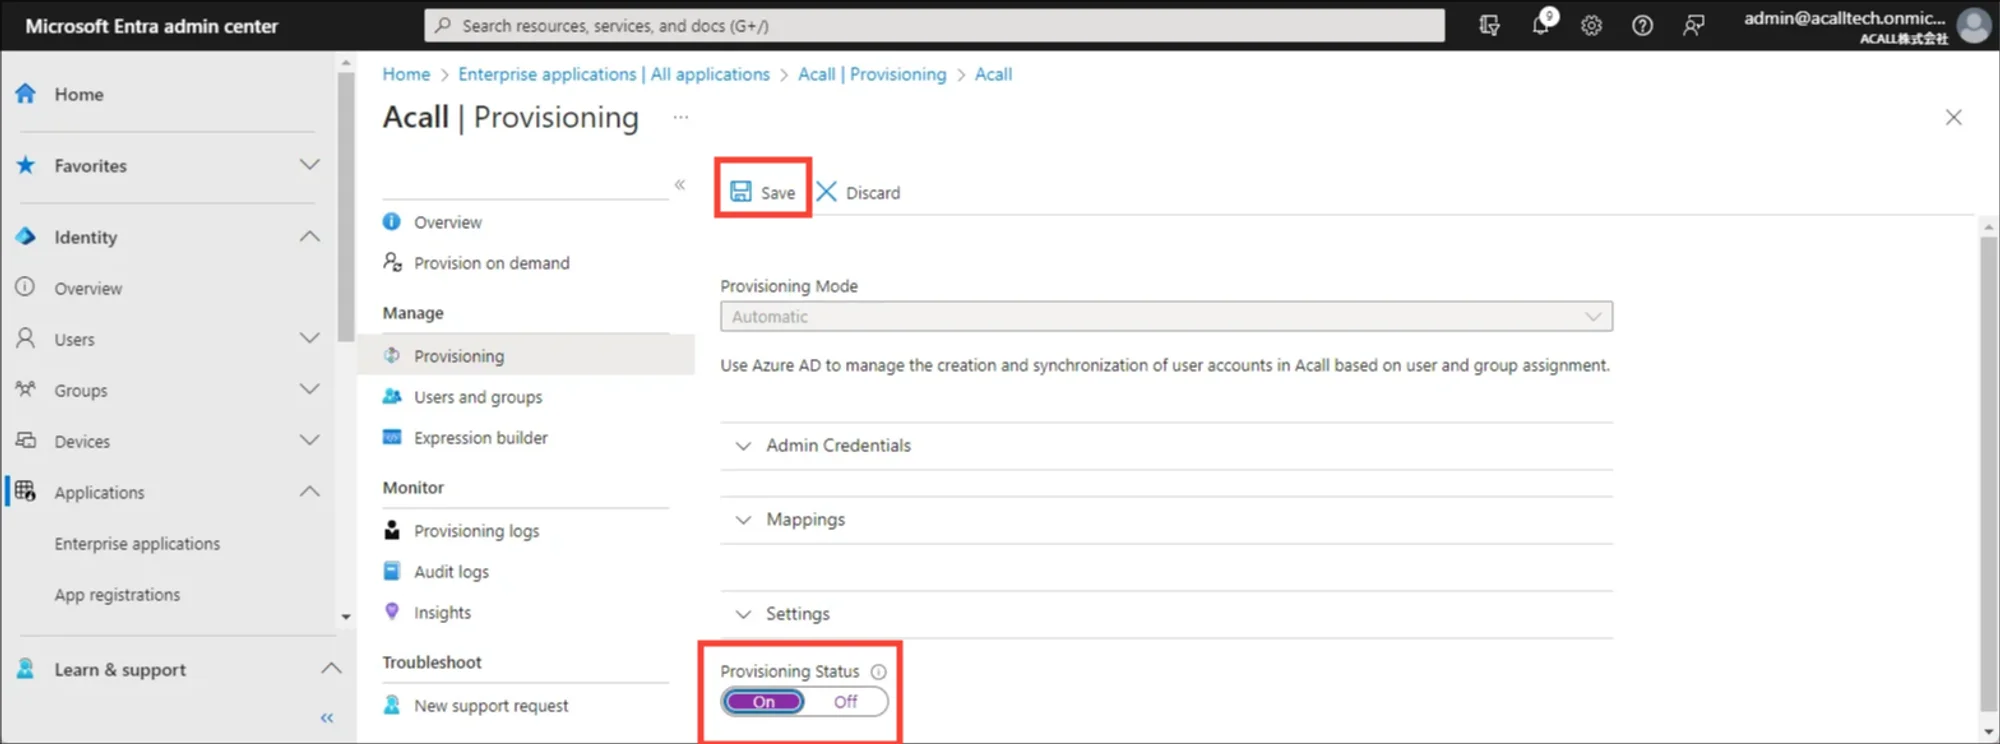
Once you complete mapping and matching settings, click [Save].
Close Mapping window and turn ON the ”Provisioning Status” toggle and click [Save]. Provisioning will start automatically.
The following follows the specifications of the Microsoft Entra ID Provisioning Service.
- Synchronization interval
- Conditions to be synchronized after the first synchronization
- Type of synchronization process (full/incremental)
Reference:How Application Provisioning works in Microsoft Entra ID
Check Provisioning Log
You can see provisioning status and number of processed users in Provisioning menu.
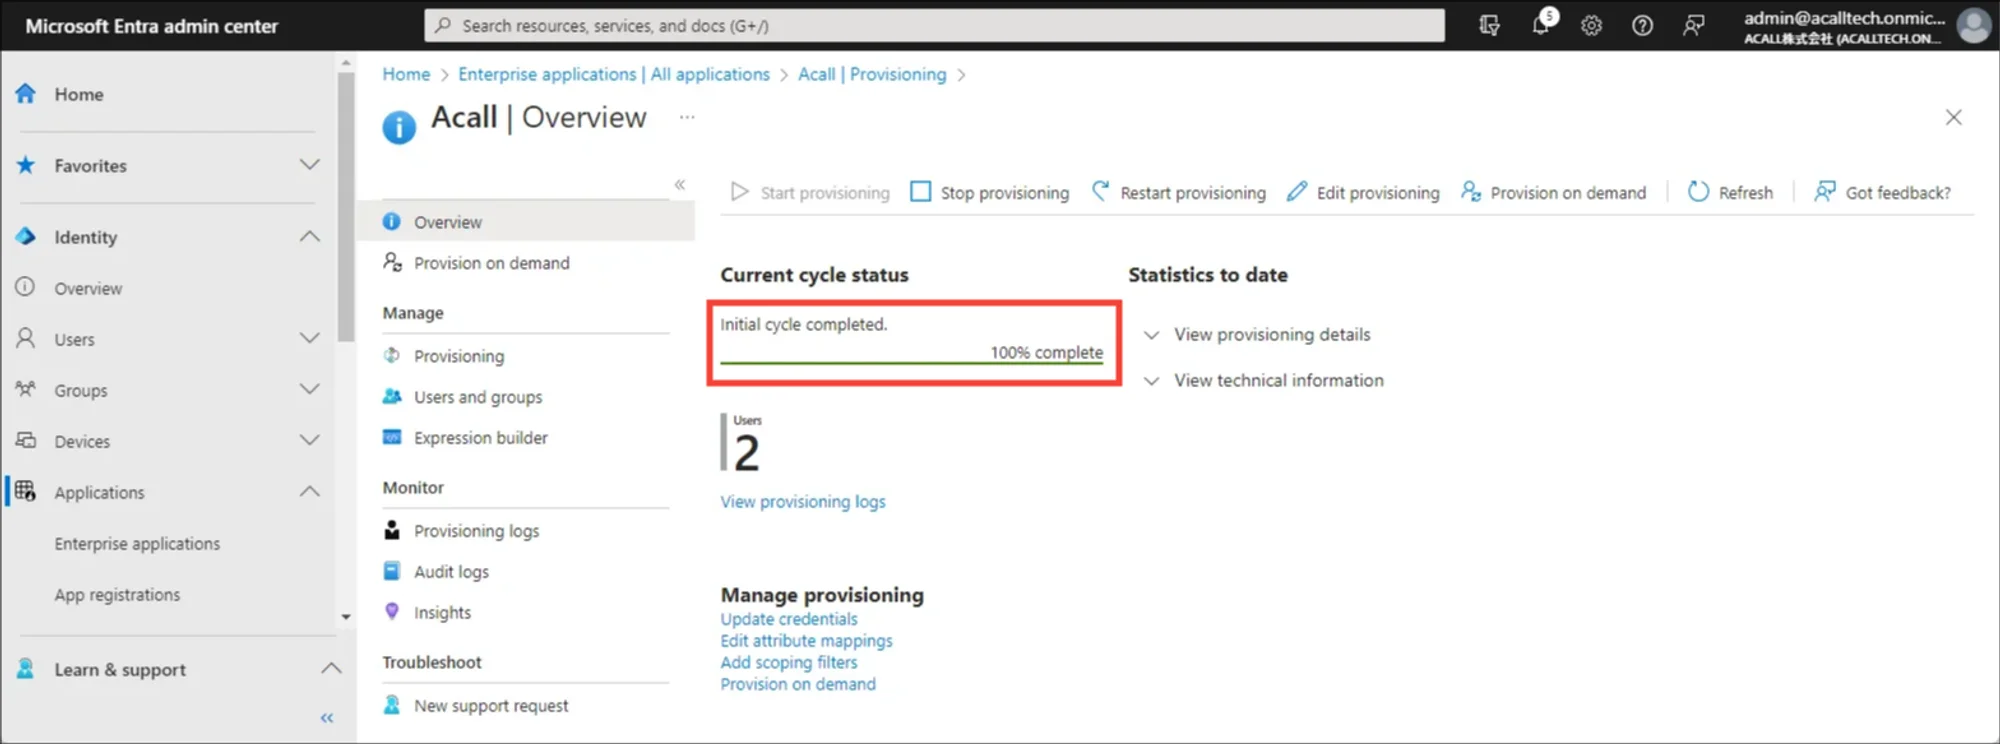
To check the detailed results, click [View Provisioning logs].
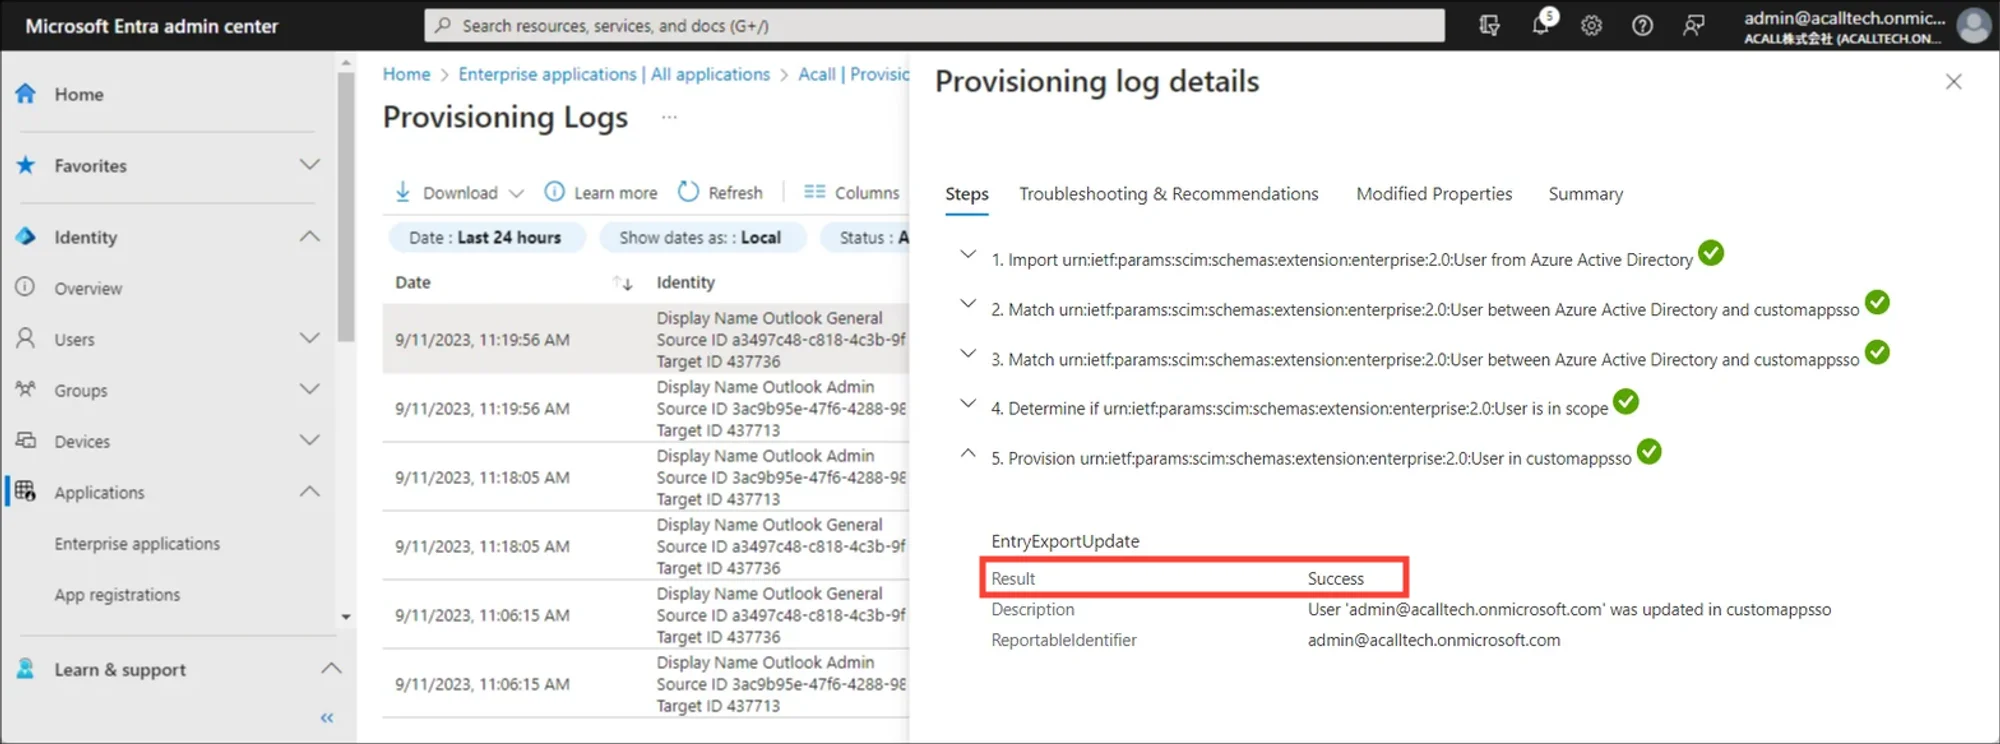
In the provisioning logs, you can see the processing details and details of the errors. If the Result is “Success” and the Description is “xxx was created in customappsso”, workers are successfully created in Acall.
Make sure that each attribute is synced as expected in Acall Portal.
If not, please check user information or attribute mapping settings.