
This page explains how to check the availability of workspaces (meeting rooms and equipment) and make reservations on Acall, and how to edit and delete reservations.
 Note

Please refer to Reserve a Workspace on Acall Mobile for how to reserve workspace on Acall Mobile.
Check the availability of workspaces
Check availability by date
Click [Reservation] > [Workspace] on the side menu.
You will see the availability for the day.

To check availability for the next day or later, select a date after clicking the calendar icon.

The availability for the selected date will be displayed on the screen.
You can select an available time slot to create a reservation.

Narrow down workspace
You can narrow down the workspaces to be displayed by checking the [filter by room] checkbox.

Check the workspace available throughout the day
Workspaces that have no reservations and are available throughout the day have a checkbox next to the workspace name. Click the checkbox to create an all-day reservation.

Workspaces that have green light have Acall Meeting (iPad) in the meeting room.
If you do not start the meeting after a certain period of time from the start time, the reservation will be automatically cancelled.

Check the availability of a specific workspace
You can check the availability of a specific workspace by clicking [RESERVE BY ROOM] and selecting a workspace.
Use this feature when you have a specific meeting room or equipment you wish to reserve and want to check its availability.

Reserve a Workspace
Create a reservation from timeline
You can reserve an available workspace (meeting room and equipment) from the timeline.
Click [Reservation] > [Workspace] on the side menu.

Drag and drop to select the time slot of the workspace you wish to reserve, then click either [create appointment] (external meeting) or [create meeting] (internal meeting).

| Type | Description |
| create appointment | Create a meeting with invited external guests (appointment). You can issue and send a QR code to the guest for reception/entry on CALL RECEPTION. |
| create meeting | Create internal meeting with no external guests or reserve equipment. |
Create internal meeting
Enter details on Create screen.

(*) is required.
| Item | Description |
| Title | Title of the meeting |
| Date/Start time/End time | Date/start time/end time of the meeting |
| Repeat | Repeat setting ※ Please refer to "Create Repeat Appointment" for detail. |
| Staff | Select person in charge for the meeting ※ Meeting participants and equipment users |
| Facilities(*) | Select meeting room/equipment ※ You can only select meeting room/equipment that are available for internal meetings and available on the date and time. |
| Serve drinks | Turn ON when you want to manage the status of drink order on Acall or use the drink order feature on Acall Meeting ※ Displayed only when drink order feature is enabled on Acall Meeting |
| auto cancel enable | ON:Auto cancellation is enabled OFF:Auto cancellation is disabled ※ Please refer to Set Enable/Disable Auto Cancellation for Each Appointment(External/Internal) for detail. |
| Private | ON:Only user who created the meeting and person in charge can see the detail of the meeting. OFF:Everyone can see the detail of the meeting. |
| Note | Notes |
Add agenda
・Agenda is optional
・When using A, you can add your meeting agenda and check on the iPad during the meeting.
Acall Meeting Timekeeper and Time Extension
Open [AGENDA] tab.

Click [Add Agenda] and enter agendas.

Click [CREATE] and complete.

You can see the agenda when you start the meeting on Acall Meeting application.

Create external meeting (appointment)
Enter details on Create screen.

| Item | Description |
| Title | Title of the meeting |
| Date/Start time/End time | Date/start time/end time of the meeting |
| Repeat | Repeat setting ※ Please refer to "Create Repeat Appointment" for detail. |
| Staff | Select person in charge for the meeting ※ Meeting participants and equipment users |
| Facilities(*) | Select meeting room/equipment ※ You can only select meeting room/equipment that are available for external meetings and available on the date and time. |
| Serve drinks | Turn ON when you want to manage the status of drink order on Acall or use the drink order feature on Acall Meeeting. ※ Displayed only when drink order feature is enabled on Acall Meeting |
| auto cancel enable | ON:Auto cancellation is enabled OFF:Auto cancellation is disabled ※ Please refer to Set Enable/Disable Auto Cancellation for Each Appointment(External/Internal) for detail. |
| Private | ON:Only user who created the meeting and person in charge can see the detail of the meeting. OFF:Everyone can see the detail of the meeting. |
| Note | Notes *Internal notes, external guests will not see this |
For external meeting, enter guest information.
Click [GUESTS] tab.

There are two options to enter inviting guest information.

| Type | Description |
| choose guest | Select from the guests already registered in the "Guest book". Please refer to "What You Can Do on the Guest Book" for detail. |
| add guest | Add new guest information. |
Choose guest: Select guest from "Guest book" to invite
Click [choose guest].

Select guests from the guest list and click [SELECT].

・You can search guests by name or company name in the search box at the top.
You can check the selected guests.

Add guest: Enter guest information to invite
Click [add guest].

Enter guest information.
You can add multiple guests by clicking [add guest].

| Item | Description |
| Company name | Company name of the guest Select from the companies already registered in the guest book or enter a company name. |
| Last name/First name | Guest's last name/first name |
| Phonetic last name/Phonetic first name | Guest's phonetic last name/phonetic first name (Furigana) |
Guest's e-mail address. QR code used on Acall Reception will be sent to this e-mail address. |
|
| Register in guestbook | Checked: Register the company and guest information in the guestbook Unchecked: Don't register the company and guest information in the guestbook |
| Visibility | Everyone: Everyone can see the company and guest information registered in the guestbook Workers-in-charge: Only person in charge can see the company and guest information registered in the guestbook |
If you don't need the information of guests other than the main guest, just enter the number of guests in [Number of visitors].

Click [CREATE] and complete.

You can also create from [ + Add New ] > [ Reservation ] in the upper right corner of Acall.

Send appointment code to the guest
For external meetings, you can send e-mail with appointment code that the guest can use on reception device (Acall Reception).
Send an appointment code when creating an "External" reservation
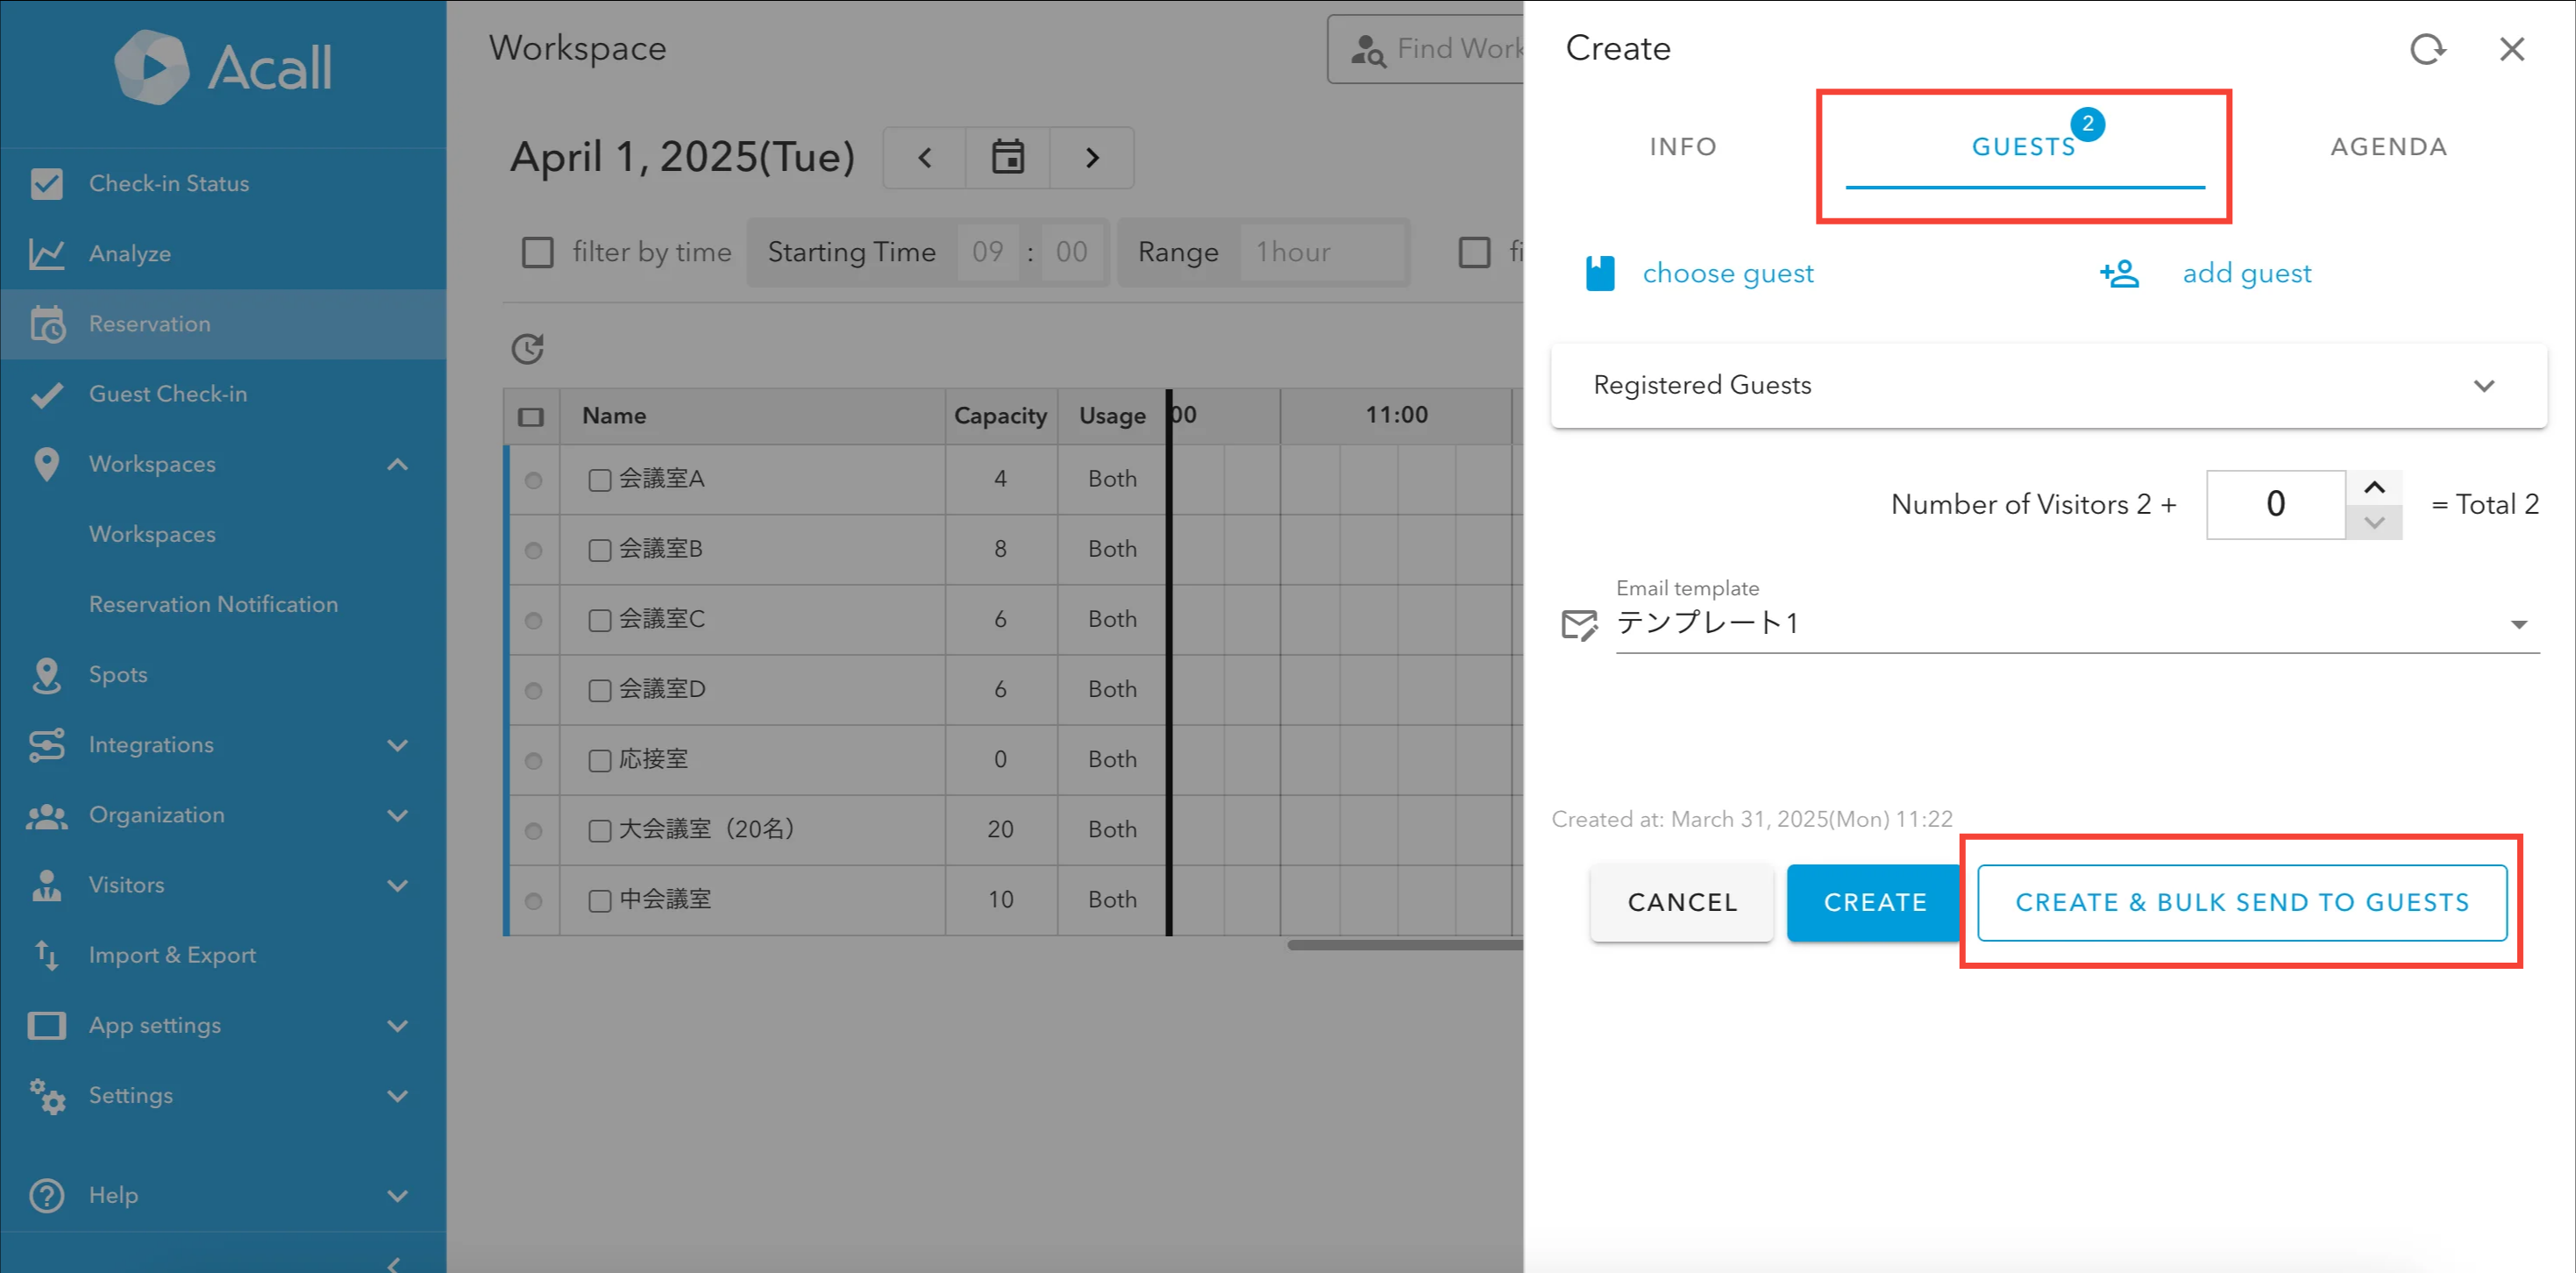
In the external meeting creation screen, click [CREATE & BULK SEND TO GUESTS].
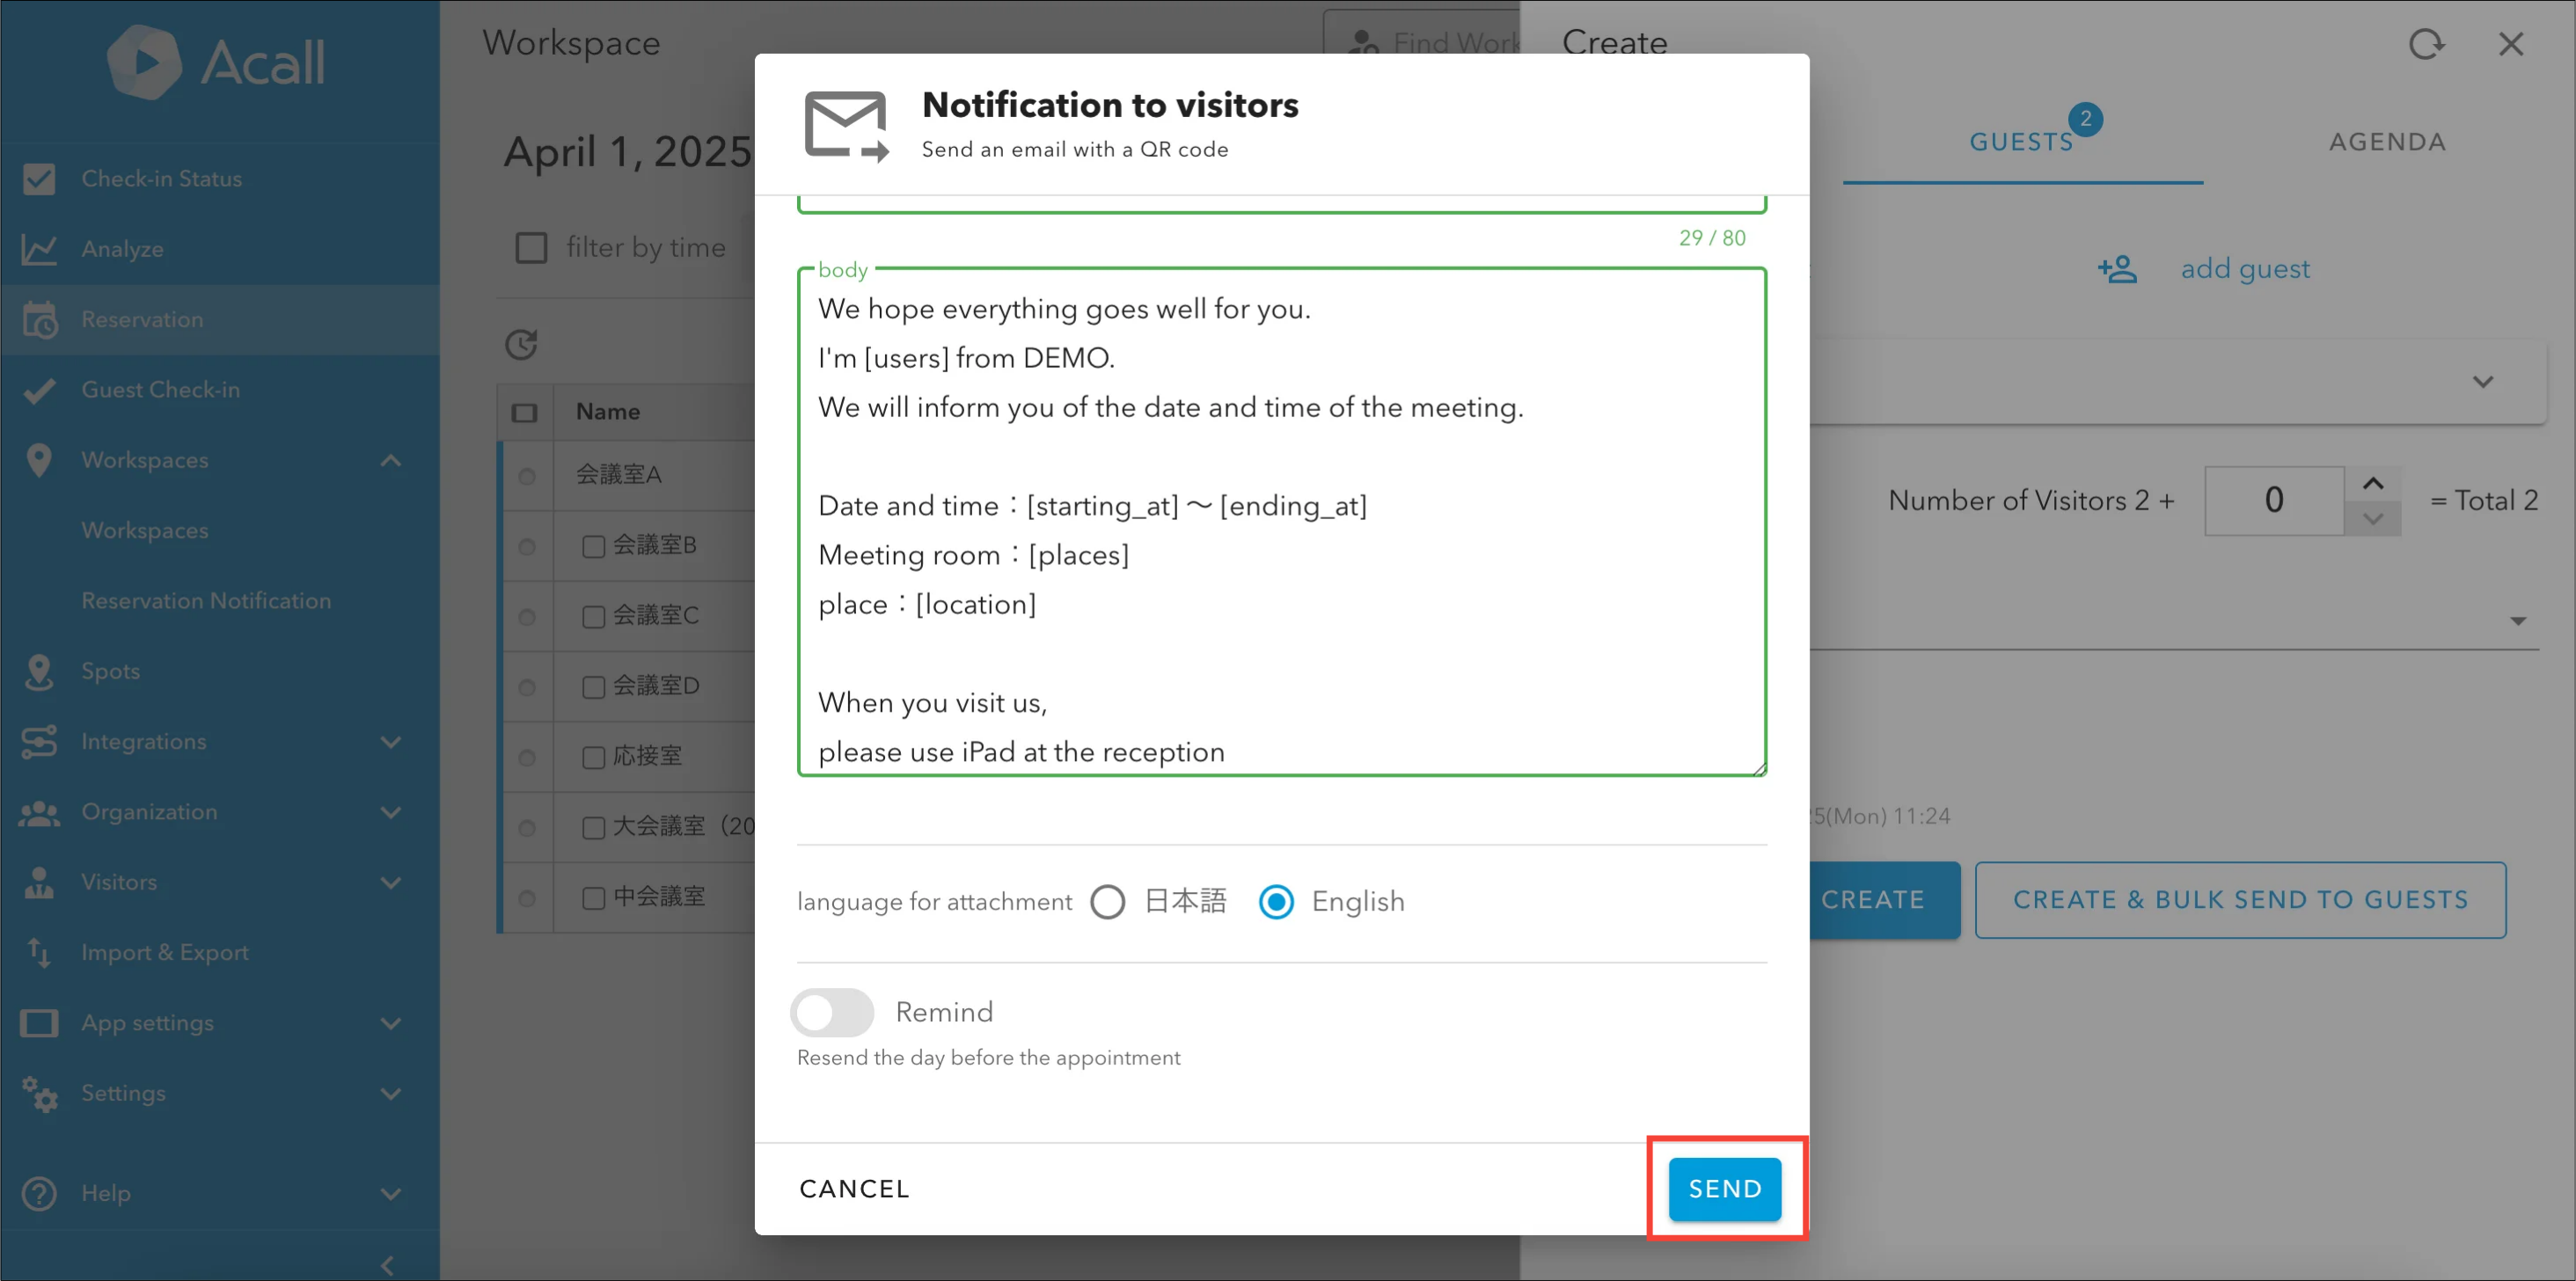
Review and edit the email content, then click [SEND] to send the email.
The persons in charge of the meeting will also receive the email in CC.
Send the appointment code after creating an "External" reservation.
Click [Reservation] > [Workspace] on side menu then click the meeting and [edit detail].

Click on the email icon next to the guest to whom you want to send the appointment code.

Review and edit the contents of the e-mail, then click [SEND].
It will also be CC'd to the person in charge of the meeting.

If you invite multiple guests and want to send an e-mail to them at once, click the the three dots and [batch transmission].

Create a reminder for the reservation details
Click the mail icon in the 'STATUS' tab, then click the toggle for 'Remind' in the [Notification to visitors] screen.
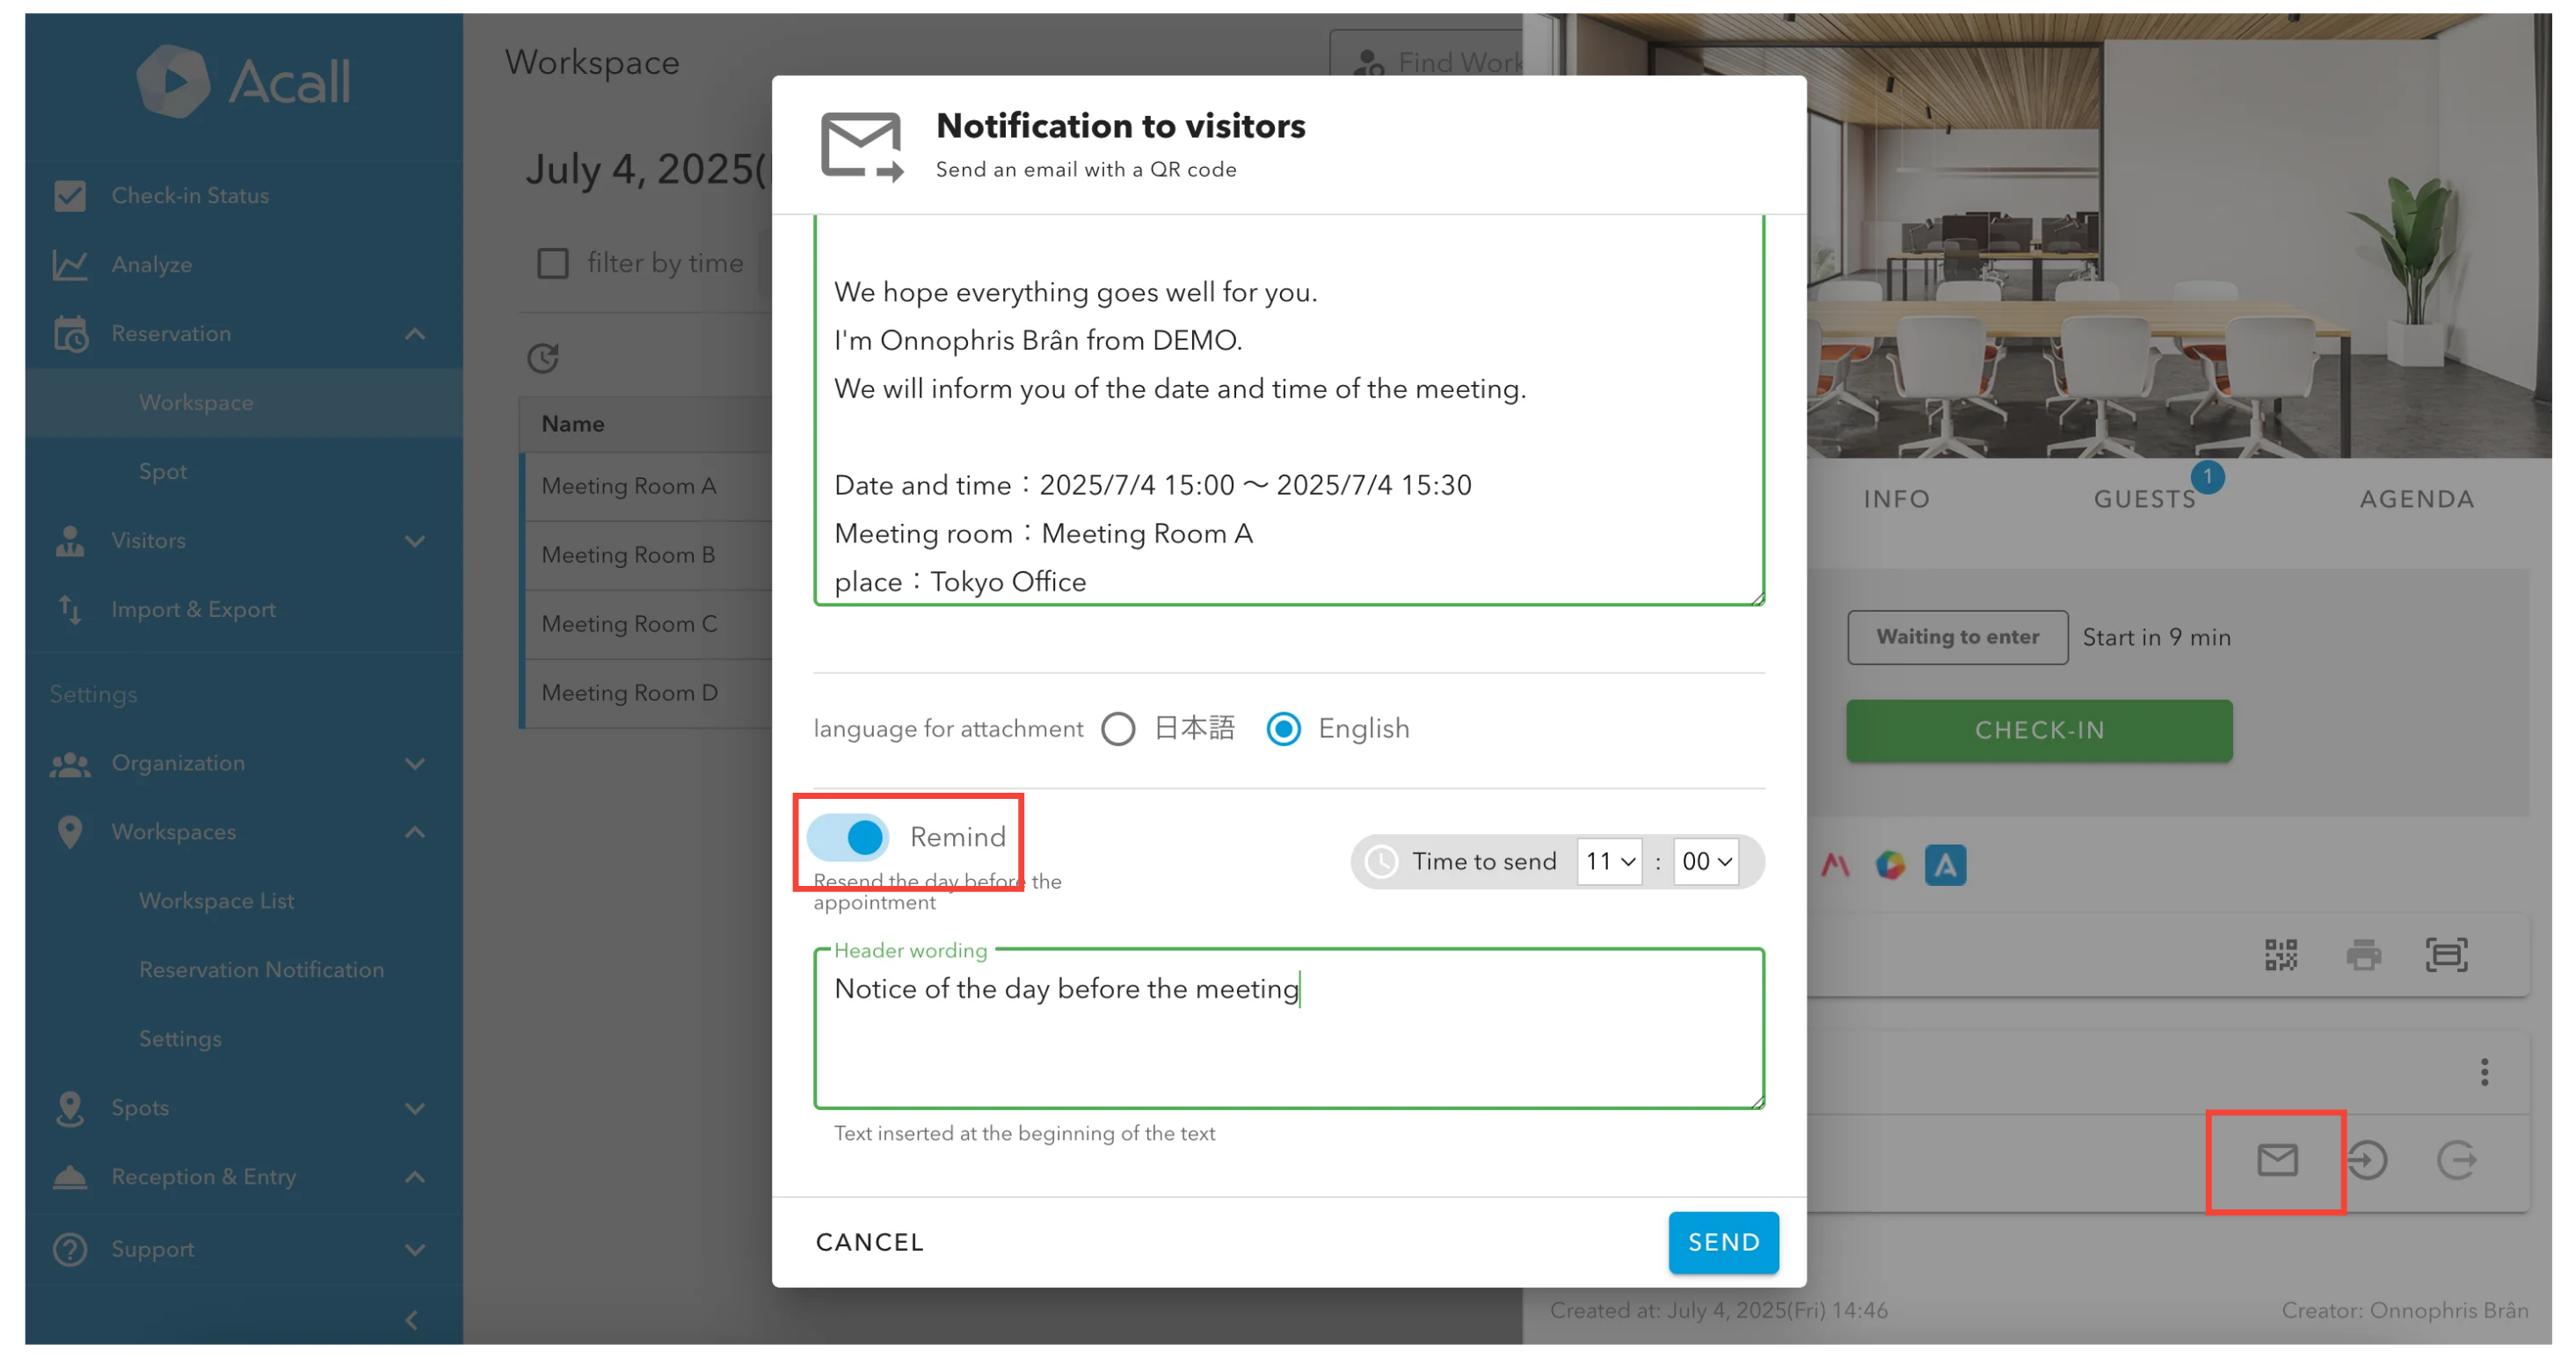
Edit the sending time and header text, then click 'SEND'.
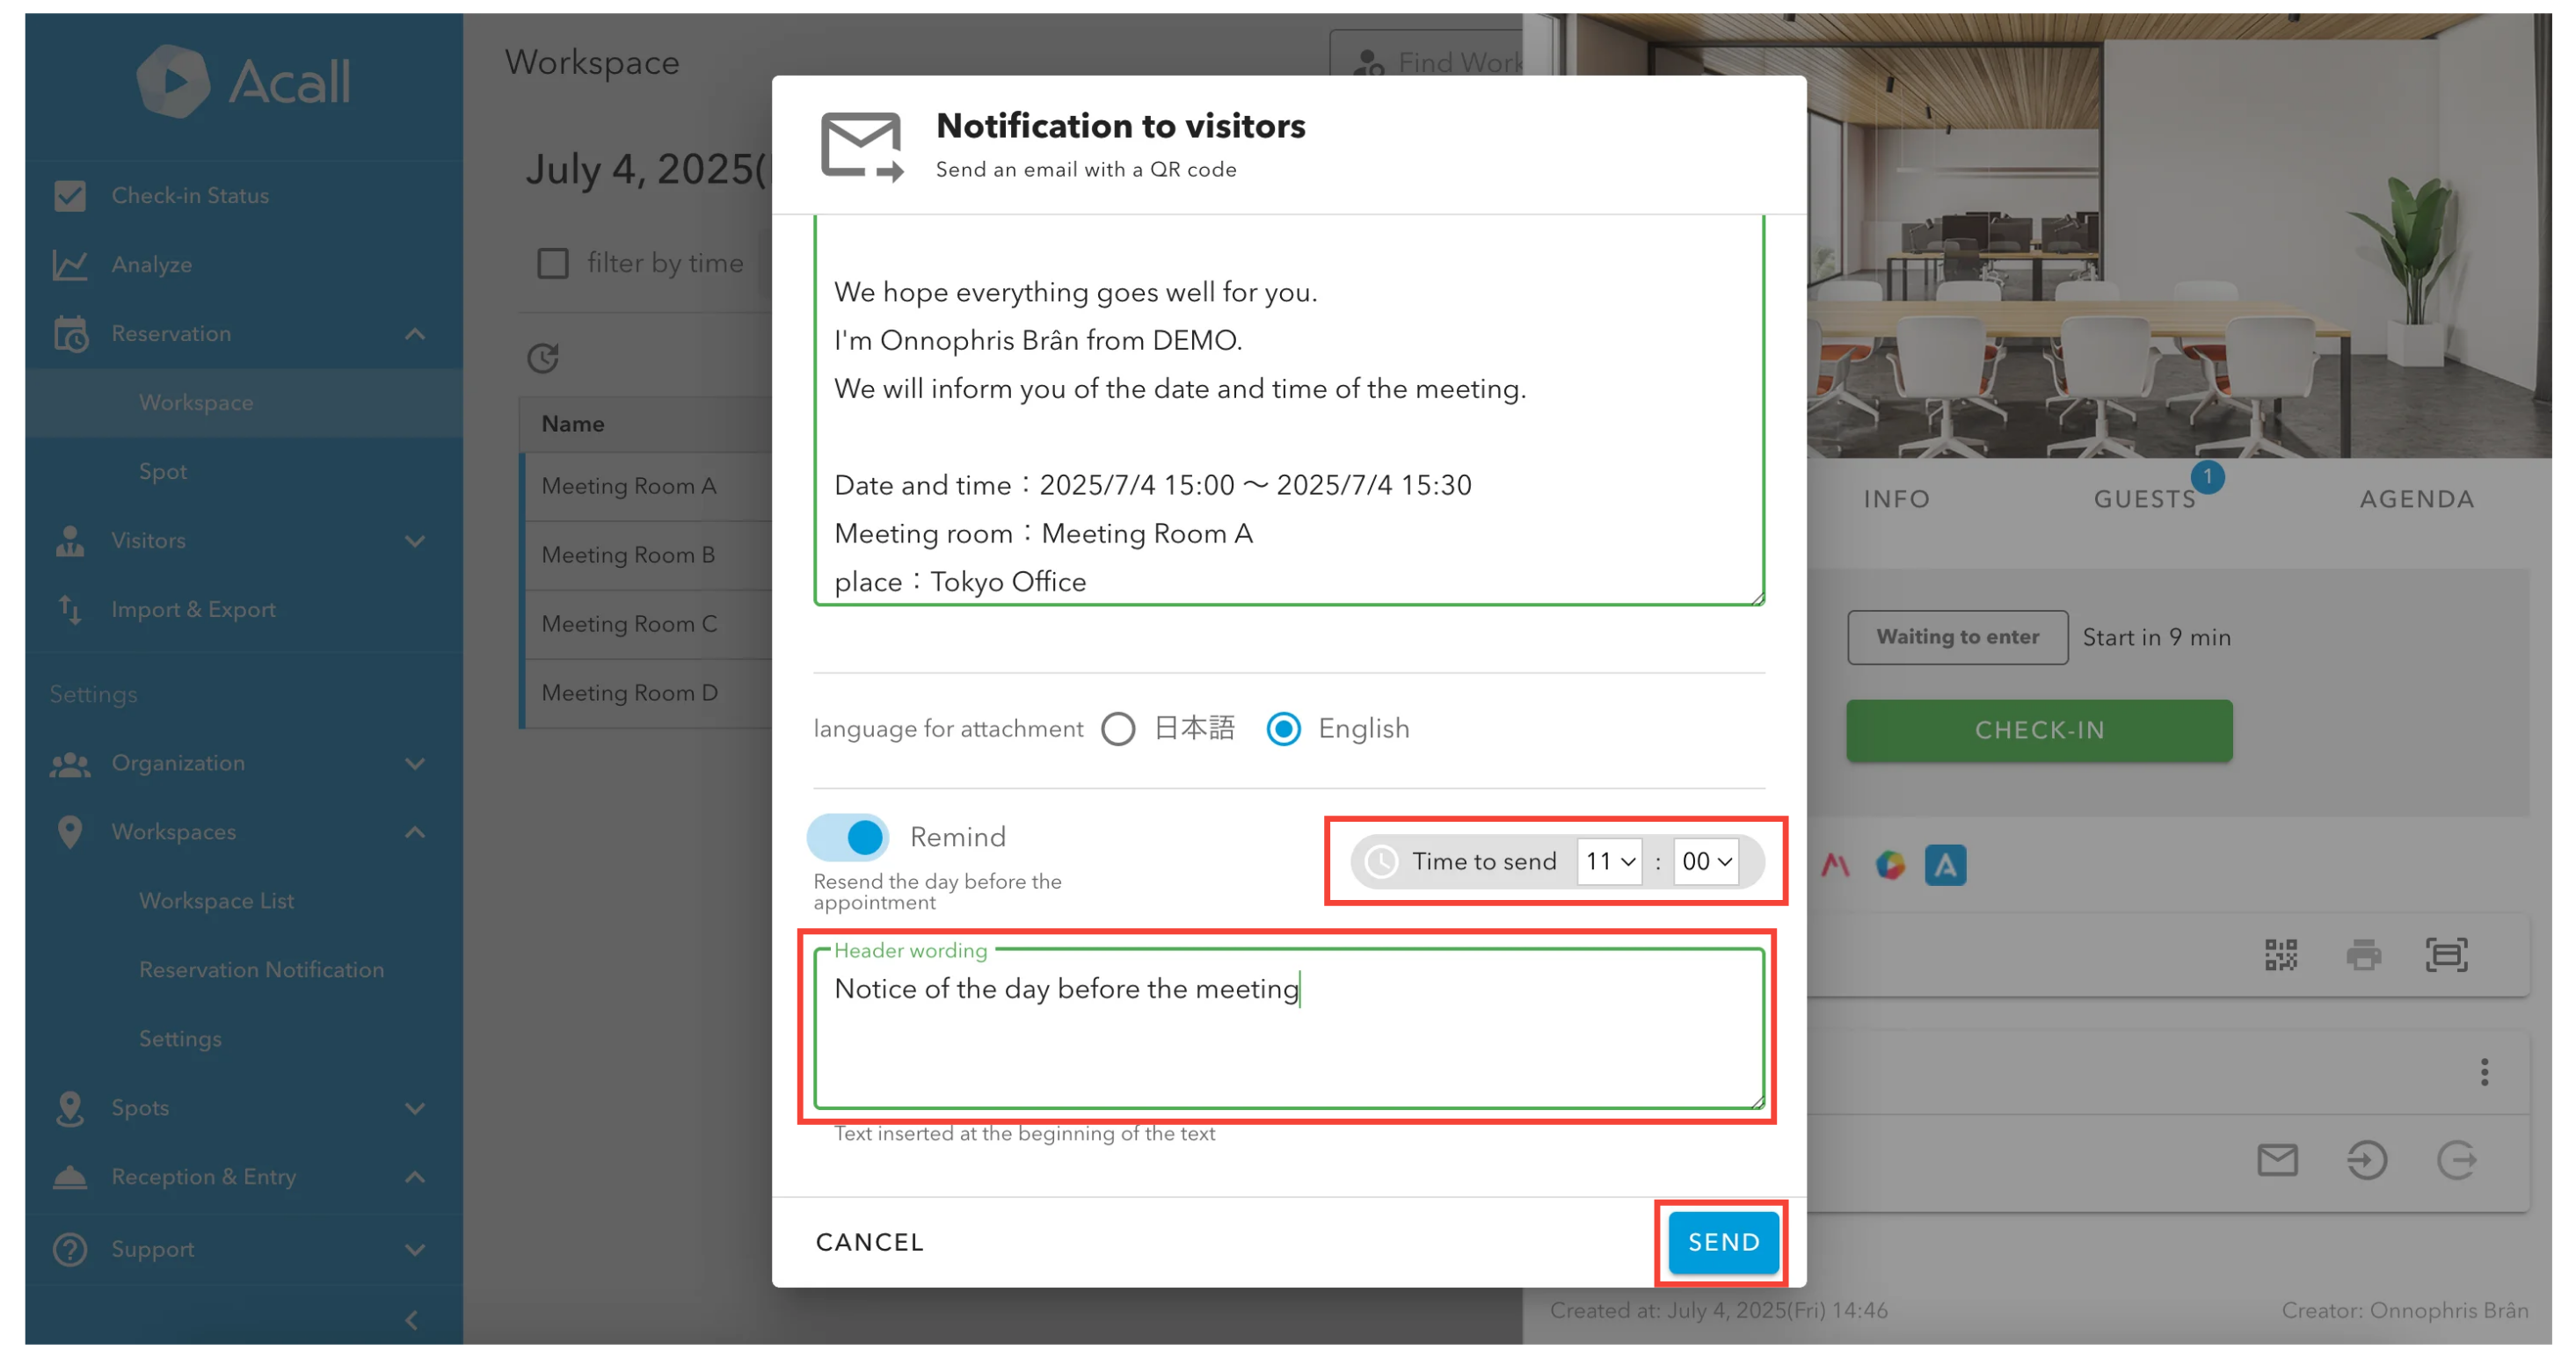
If the reminder time for the day before the appointment has already passed (e.g., for same-day reservations), turning on the 'Remind' toggle and clicking 'SEND' will send two emails simultaneously: the regular appointment code email and another appointment code email with the reminder header text.
If you make any changes after creating the appointment, be sure to click the 'SEND' button for the reminder again. If the 'Remind' setting is enabled and you do not resend after making changes, the reminder email will contain outdated information from before the changes were made.
Edit reservation
Click [Reservation] > [Workspace] on side menu then click the meeting and [edit detail].

Edit the information and click [UPDATE].

You can not edit past meetings.
Delete reservation
Click [Reservation] > [Workspace] on side menu then click the meeting and [delete].

Notes on reserving a workspace on Acall
Repeat appointment and "Maximum Reservation Period"
If the "Maximum Reservation Period" in "Reservation Policy" is enabled, general users can not create reservations for dates that are later than the "Maximum Reservation Period".
However, general user can create repeat appointment for date that are later than the "Maximum Reservation Period". The start date of the repeat appointment cannot be a date that is later than the "Maximum Reservation Period".
Example: Even if the "Maximum Reservation Period" is "3 months," you can still create a one-year repeating reservations.


